
 by Steven D. Johnson
Racine, Wisconsin
(Page 2 of 4)
Previous Page
1
2
3
4
Next Page
The Ultimate Miter Saw Work Station (I Hope!)
Embarking on the design and build of a miter saw work station that will meet all my criteria is a bit daunting, but the good readers of Wood News Online have supplied a lot of ideas, creativity, encouragement, and more than a bit of good humor. I have seen well-executed builds of others' plans, modifications of previously published designs, original designs, and adaptations of existing cabinets and fixtures. It seems woodworkers intuitively strive to accommodate their unique needs, space constraints, and methods of work, and generally, it appears, they succeed.
I have seen elaborate slide-out, swing-up, and detachable wings for cutting longer pieces...others just set up roller stands when needed. Ruled tapes are often incorporated into extended fences and most have devised a way to quickly make repetitive cuts. Storage is of universal importance, and the pictures show doors, drawers, and open shelving. We woodworkers like to hang things in handy spots, and a lot of folks have hooks galore, with everything from wrenches to spare blades attached to their miter saw workstations. Some units are mobile, other woodworkers evidently have the luxury of space (and good planning skills) and have their miter saws fixed in a permanent location.
|
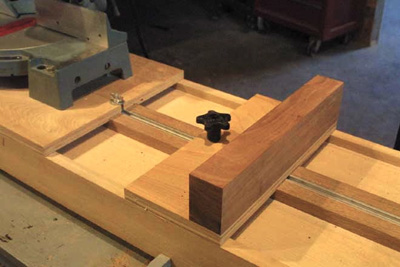
Figure 1 - Al Flinck's sliding work support could
be easily adapted to any height miter saw
|
The most "future proof" design was from Al Flinck in Montana. He has the miter saw sitting on a level work surface and work supports that slide in a t-track on the same plane. A new miter saw might only require replacement of the work supports and not the whole table! It seems every woodworker has figured out a solution to at least some, if not all, of my design criteria...except perhaps for dust collection.
Power miter saws (and radial arm saws, for that matter) scatter dust, dust, and more dust...huge clouds of the stuff. It seems solving, or at least minimizing, that problem is a top-of-mind issue for many woodworkers.
|
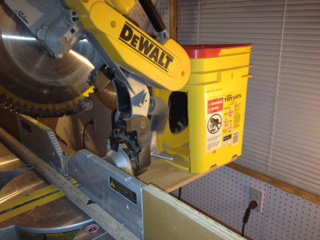
Figure 2 - Dr. James Randolph creatively
adapted a kitty litter container to dust collection
|
Andy Ziny's tongue-in-cheek suggestion of opening the doors wide, setting the miter saw by the open door, and placing a football-field size fan behind it to blow the dust away may be demonstrating some generalized frustration with dust collection. In fact, he recommends we call it instead "dust control." Blast it out to the great outdoors and let it scatter. He lives in Colorado and simply must be more "warm blooded" than me! Blasting my heat out along with the dust is a chilling thought!
A stainless steel restaurant-style vent hood, like used over a grill, is above my pay grade. I like the creatively adapted plastic kitty litter box that Dr. Randolph in Long Beach, Mississippi uses. My cats like the litter than comes in a bag, but they would probably adapt for me. I do feed them, after all.
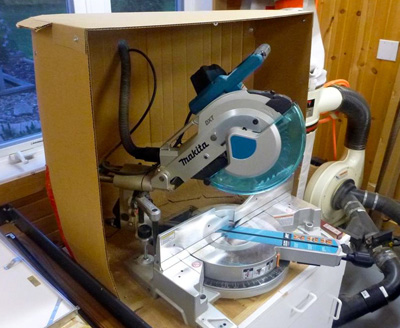
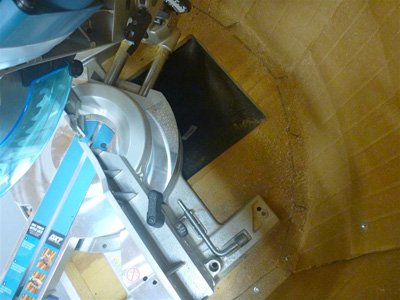
A laminar flow system that sets up a cross current, blowing the dust from one side to a negative pressure inlet on the other side has possibilities but sounds rather scientific for this down-to-earth guy. A commercially available job-site dust catching hood looks good, but it's a bit pricey for me. For pure practicality and cost-effectiveness, it would be hard to beat the big cardboard enclosure Dennis Wert from Westlake, Ohio built. It features a hole in the bottom, just behind the saw, to provide downdraft collection and another hole in the back through which a hose connects to the saw's dust port. Dennis tried out the design in cardboard, intending to fashion it eventually of sheet metal, but it's been working so well, why change it?
|
|
Figure 3 - Dennis Wert's cardboard hood works great
|
|
Figure 4 - The secret is the combination of a vacuum
hose connected to the saw's port (see photo at left) and
this large suction port behind and below
his saw to catch everything else
|
Somewhere residing between Dr. Randolph's kitty litter box and Mr. Wert's cardboard hood is a design idea percolating like a good cup of coffee. You just have to love this stuff!
Based on all the great input, a basic workstation design has shaped up. As you can see, the miter saw will sit on a lower "deck" between twin work supports. The work support on the right is longer, accommodating my method of work, which is typically to hang the longer ends of boards off to the right to make the cut.
|
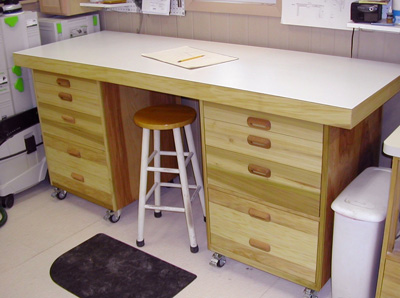
Figure 6 - Construction of the miter saw workstation
will be similar to this Shop Desk/Workbench
|
The entire top assembly will be built as one unitized unit but separate from the pedestal supports. This will allow me to break the assembly down if necessary and even to tote the top assembly to a work site if needed (with help, of course). The pedestals will be built using the same techniques used to build the pedestals of the Shop Desk/Workbench/Assembly Table/Clutter Catcher I made a few months ago. The top assembly will contain drawers and the pedestals will have cubbyholes for wood scraps on the right side and slide out trays on the left side, sized to accommodate an assortment of Festool Systainers. The whole thing will be on lockable casters.
The top work supports will have integrated t-tracks so that a movable (and removable) fence can be mounted. I'll cover the whole top, including the recessed saw deck, with laminate. Laminate is easy to clean and dust moves across it easily.
I'm still working on the design of the "dust control system" (name courtesy of Andy Ziny) but it will definitely incorporate elements of Dr. Randolph's kitty litter box and Dennis Wert's dual-port cardboard box.
Be sure to check back next month and see how the build is progressing and check out the finished dust control design. And be sure to keep those emails coming to:
downtoearthwoodworks@me.com
(Page 2 of 4)
Previous Page
1
2
3
4
Next Page
Return to Wood News front page
