
 by Steven D. Johnson
Racine, Wisconsin
(Page 4 of 4)
Previous Page
1
2
3 4
Building the NEW Down To Earth Workshop, Part 1 – Rough Wiring
The garage-to-shop conversion project is finally underway. Even though all of the big equipment
(router table, drill press, band saw, jointer, planer, bench, mortiser, etc.) is sleeping peacefully
in a big on-site storage box, the garage is still full...very full. All the tools and equipment used
in the "unhandy" house, left over materials, and other bits and pieces are in the garage. Miter
saw, saw horses, circular saw, jig saw, various drills, an air compressor, a shop vacuum, various
tool bags and everything that was hanging on the walls in my old shop is now scattered, stacked, and
stowed in the garage. It's a mess.
Because of the cramped quarters, I will be renovating, converting, and finishing the garage in
quadrants. I started in the southeast corner because that is where the stairs to the second level
will be built (please see the video "New DTEW Shop Plans").
The theory goes, once the stairs are built, the second level can be reinforced, floored, wired,
insulated, and finished, and much of the "stuff" in the garage can be moved up and out of the
way.
With bare walls and open studs, the first step is to rough run wiring for future circuits. First,
several days were spent tearing out old built-in shelves, removing tens of dozens of nails (used by
the previous "unhandyman" for hanging who-knows-what), and cleaning. Once the southeast corner was
reasonably clean, I started to run wires through the studs. Of course, circuits will not be limited
to, or contained in, a specific quadrant, so a little planning ahead was necessary. Where a long
wiring run passed through the quadrant on its way to other lights, switches, or outlets, I ran the
wire and left a length long enough to reach its next termination point.
Unexpected challenges cropped up daily in the "unhandy" house, and the garage is proving to be no
exception. When planning the wiring, I had hoped to leave relatively intact the one circuit coming
from the house. It currently feeds lights, the garage door opener, a couple of outlets, and the
power to a barn located about 25 feet behind the garage. With a new subpanel in the garage, this
circuit could eventually be used just for the barn and perhaps one security light in the new shop,
since there will be no garage door opener and all the new outlets will be run from the new subpanel.
Several problems, though, forced me to reconsider.
First, the existing cables were run on the face of many studs, which would entail disconnecting,
drilling, and re-routing the cable. Second, the wiring was a bit of a bird's nest, and figuring out
where everything went and what it did was mind-boggling. Last, and most critical, it turns out that
the cable did not contain a ground wire, and that the cable feed to the barn was interior-grade wire
and not rated for outdoor or ground-contact use...back to the drawing board!
|
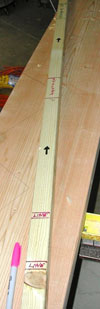
Figure 5 - Story pole with locations for
wires, outlets and switches marked.
|
To resolve these issues I decided to completely eliminate the circuit from the house and run
everything in the shop exclusively from the subpanel. New cable was run through the walls and out
to a waterproof box I mounted to the backside of the garage exterior wall. Then I ran
ground-contact rated cable through liquid tight conduit to the barn – a little overkill, actually.
Ground-contact rated outdoor cable would have been sufficient, or regular wire through a liquid
tight conduit would have sufficed. Using both reminds me of Justin Wilson (safety engineer, Cajun
chef, humorist, songwriter) who always wore both a belt and suspenders; but, as he often said,
"There are just some things I'd never leave to chance."
Neat and clean describe my shop habits pretty well (although one would never discern that from
the current mess). Even though the wires will be hidden behind insulation and wall paneling, there
are still very good reasons to make clean, organized, symmetrical wiring runs. In order to do that,
I made a story pole.
The story pole was cut to fit snugly between the bottom and top wall plates, and on it I marked
locations for wires, switches, outlets, and a "no wiring" zone where I will eventually attach the
French cleats around my shop walls. I used red, green, and black permanent markers, and labeled
everything. Besides serving as a guide for drilling the holes for wires and mounting switch and
outlet boxes, the story pole will come in handy later, as you will see in the next installment.
|
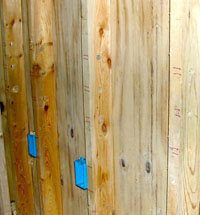
Figure 6 - Studs marked and drilled,
outlet boxes nailed into place.
|
A couple of notes here about switch and outlet placement...the NECA-1 Standard (National
Electrical Contractors Association, "NECA-1 2010 Standard Practice of Good Workmanship in Electrical
Construction (ANSI)") specifies mounting heights for various electrical devices, but the
recommendations are not enforceable. You should check, however, with your local building department
or a knowledgeable electrician before proceeding. Where I live the height of switches and outlets
is not rigidly controlled, but I stuck with the NECA-1 Standard of 18 inches above floor height for
outlets. For switches, NECA-1 recommends 48 inches but I set the center of each switch box at 52
inches. This keeps the bottom of each switch box and cover plate above 48 inches, enough space that
a sheet of plywood can be leaned against the wall without obscuring or damaging a switch.
Using the story pole, I drilled holes through the middle of each 2 X 4 at the marked locations
and started to pull wire. Pulling wire is pretty easy, but can get strenuous and difficult when
going around corners. Two insulated 12 gauge wires and a ground wire bundled inside a sheath can be
pretty stiff. Working around a tight corner is tricky.
|
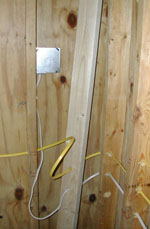
Figure 7 - A loose stud in the
corner helps when pulling stiff cable.
|
I was lucky that the person who built the garage took a relatively common shortcut, and did not
properly frame the corners. An additional stud was needed to provide an attachment point for the
wall covering, but rather than toenail it into place now, I cut it to size, drilled holes according
to the story pole, and leaned it loosely in place. The loose stud helped get the stiff cable around
the corners. This short video
gives more detail.
Once the wires were roughly in place, I pulled each into its appropriate switch, outlet, or
junction box and snipped it to length. Remember to leave plenty of extra length for the next
step...there is nothing more frustrating than trying to connect too short wires to an outlet or switch.
Not being a master electrician (far from it) or possessing a particularly admirable memory, I
labeled most of the wires at both ends. On the ends that will eventually connect inside the breaker
box, I labeled them with circuit designations (i.e. "south and east wall outlets," "upstairs
lights," "outdoor feed," etc.). At the business end, I labeled only the wires that might be in
question later (i.e. which wire comes from the feed and which goes on to the next outlet in a
daisy-chained outlet circuit).
|
|
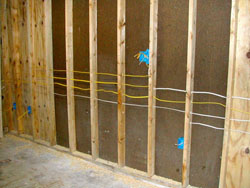
Figure 8 - The south wall, rough-wired and ready.
|
Some electricians roll up the extra wire extending from each box and stuff it inside, ostensibly
making it easier for the next tradesman. Wires hanging out of boxes can get in the way while
insulating or hanging sheetrock or paneling, but successfully stuffing stiff wire inside a small box
necessitates cutting the wire a bit shorter. I like to leave a lot of extra wire, so I just left
them hanging.
So far, circuits running east and north from the breaker box are rough run through the south wall
and partly through the east wall of the shop. They include a dedicated circuit for my shop vacuum
and a small air compressor, a circuit for 110 volt outlets on two walls, a 220 volt line, a line
that will be used for a heat source and a line for the upstairs lights. The rest of the circuits in
the shop will head west and north from the breaker box, and will include another 110 volt outlet
circuit, another 220 volt line, all of the shop lighting, and a line for outdoor and security
lighting.
Of course, working in quadrants means I will repeat this process four more times, but that's
okay. There is satisfaction in seeing progress, and by working on a section of the shop at a time,
I get to move through subsequent steps in each quadrant and get an idea of how things will look when
finished.
If you are wiring, re-wiring, or building from scratch, here are some down-to-earth hints to make
things easier:
|
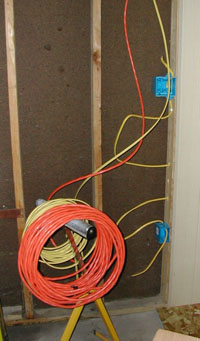
Figure 9 - Wire rolls ready to
go to the next quadrant.
|
- Make a story pole – heights of visible and invisible circuit components will be consistent,
and later when you drive in that 8-penny nail for hanging some shop accessory, you will know
exactly where the wires are located behind the walls.
- Wire is expensive, but cut it long – we woodworkers occasionally cut a board too short and
complain that we don't have a "board stretcher." Turns out that electricians have the same
joke, referring to a "wire stretcher." Leaving extra wire at each box and panel may help
prevent outbursts of colorful language.
- Buy tools like real electricians use – a 90-degree bent nose sheathing stripper is, perhaps,
the niftiest tool ever. Reach deep into an outlet box, squeeze the handle and pull...the cable
insulation comes off neatly and you will save serious amounts of time and more than a few
skinned knuckles. A dedicated stripper for the gauge of wire you are using is a great idea. A
special tool that twists on wire nuts gives extra leverage and makes better connections. And,
importantly, get a real cable cutter. Trying to cut through thick cable bundles with a regular
wire cutter is torture.
- Plan carefully and then overdo it – after the insulation and wall covering is done, adding
or moving a switch or outlet is no fun. It may seem obvious, but this is where most folks end
up disappointed and still wind up with birds' nests of extension cords and plug strips. If you
think two outlets by your workbench will suffice, put in four. If you think ten lights in the
ceiling will be enough, put in twelve (or more!). If you think two 20 amp circuits for outlets
is enough, there will be a time when you are running a tool, a vacuum, your coffee cup warmer
and the stereo, and you will decide to turn on the space heater, and the breaker will trip. As
an old electrician friend of mine once said, be "generous with circuits...breakers are
cheap!"
- Label all the wires – yes, you will remember tomorrow which wire goes where, but if you get
interrupted for a few days or a week, you will be happy that the wires are labeled.
- Unroll the wire as you use it... do not "uncoil" the wire. Electrical cable has a
rectangular profile, and throwing the roll on the floor and allowing it to "uncoil" will result
in twists that are hard to pull through drilled holes. Unrolling the cable will keep the
profile flat and untwisted. I am using a roller stand as a temporary wire rack and it allows me
to unroll the wire neatly, without twists.
- Above all, check with your local building department and/or an inspector. Make sure you get
the right permits (if required) and that all work is done to code or better. Use quality
materials. Work safely, and if you are not sure about something, stop!
Next month please follow along as the garage/shop conversion continues with insulation and wall
skinning. Finally, the dysfunctional shop door is being replaced and the stairs to the second level
are being built. The nifty ladder-on-a-rope gets a proper send-off next month, too. You can
follow the process by going to the Highland
Woodworking youtube site. Thanks for reading!
(Page 4 of 4)
Previous Page
1
2
3 4
Steven Johnson is recently retired from an almost 30-year career selling medical equipment and
supplies, and now enjoys improving his shop, his skills, and his designs on a full time basis
(although he says home improvement projects and furniture building have been hobbies for most of his
adult life).
Steven can be reached directly via email at sjohnson13@mac.com.
Return to Wood News front page

