
 by Steven D. Johnson
Racine, Wisconsin
(Page 4 of 4)
Previous Page
1
2
3
4
Building the NEW Down To Earth Workshop, Part 2 – Insulation, Skinning the Walls, Finish Wiring
Once the rough wiring is run (and in the case of remodeling, any cleaning, reconstruction, or
repair work is done), insulation is the usual next step. Kraft paper backed insulation is being
used in the Down To Earth Woodworking Shop, along with strategically placed bits of expanding foam
and Styrofoam insulation.
Fiberglass insulation is inexpensive, works pretty well, and is easy to install. But maximum
effectiveness depends on proper installation. Insulation is intended to reduce, or slow, conductive
heat transfer. Like double-pane window glass, the air spaces between strands of fiberglass provide
conductive breaks, further slowing the conduction of heat. Large air spaces, though, can allow air
movement, actually speeding heat transfer. Therefore it is important that the fiberglass fill large
air pockets. It is also important that the fiberglass not be overly compressed as the compacted
glass fibers can actually speed up heat transfer.
|
|
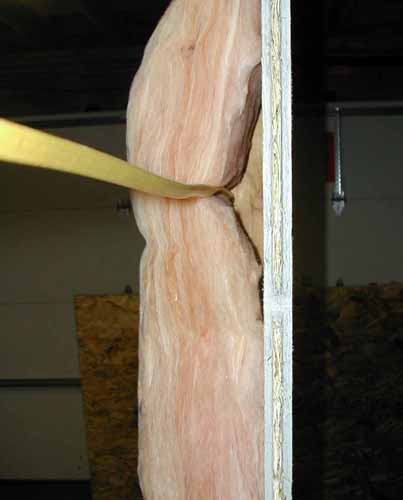
Figure 11 - Without a relief slit in the fiberglass, the insulation will
compress
and not fill the space behind wires, pipes, etc.
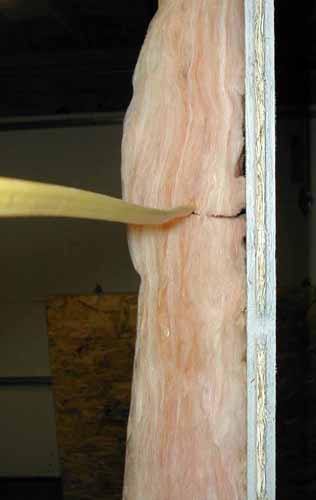
Figure 12 - cut a slit in the fiberglass, and it will "nestle" around and
surround
wires, pipes, etc.
|
For the walls, the story pole used to guide the rough electrical runs is also used to cut the
insulation (see the
video
:
"Garage Shop Conversion, Part 2 - Insulation"). The story pole was cut to fit between the top and
bottom wall plates, so the length is perfect for cutting the insulation to size. I also used the
marked locations of wires on the story pole to cut through about half the layer of insulation making
a relief notch. These relief slits allow the insulation to go around and envelop each wire. The
pictures demonstrate how the relief notches prevent compression of the fiberglass and the resultant
large empty air pockets.
For me it is easier to place each insulation batt (short for batting) into place and trim for
electrical outlets and switch boxes in situ. A small bit of scrap insulation was also shoved in
behind each electrical box between the box and the outer wall sheathing.
After carefully fitting each batt of insulation to the wall cavity, I used staples every foot or
so to attach the Kraft flaps over the studs. Overlapping the Kraft flaps helps to assure a seamless
vapor barrier.
The accompanying
video
shows more detail, but just a couple of words about safety and comfort
when working with fiberglass insulation. First, wear a mask. An N95 rated dust mask is sufficient.
Gloves should also be worn. Some people are more susceptible to "itchiness" and I fall into that
group. Long sleeves help, and the tube sections of an old pair of tube socks are great to cover the
open section of your arms between sleeve and glove. Some folks wear a hat to keep fiberglass out of
their hair, but I'm not a "hat person." When finished I use my shop vacuum to capture stray strands
of fiberglass on my clothing, and yes, from my hair. Eye protection is a good idea, too,
particularly if you are insulating overhead.
|
|
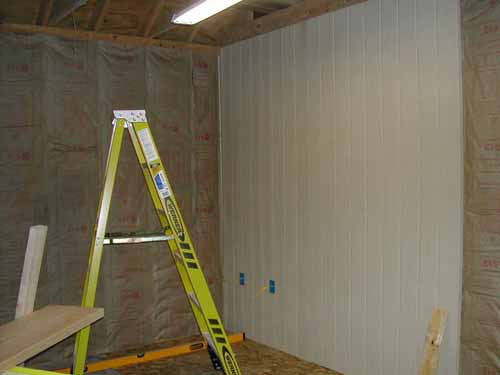
Figure 13 - The first quadrant, nearly finished
|
After insulating, the walls are ready to be covered. As in my previous shop, I am using
Louisiana Pacific's (LP) 4 X 8 foot SmartSide® sheet siding for the interior walls. The material is
made from wood fibers that are impregnated with zinc borate to protect against fungal decay and
termites and then bound together with exterior grade resins. According to LP, the product
withstands extreme heat and cold, humidity, and rainfall. It looks a bit like Masonite board from
the back, but the front is molded with a wood grain texture and is primed. The panel I chose has
grooves on 4-inch centers and the edges are shiplapped. It is actually pretty nice looking. The
product is 0.438" thick (7/16 inch). I am using color-matched paneling nails to attach the sheets.
I like this product for the shop because it will take significantly more abuse than drywall. You
can purchase LP SmartSide® products at big box stores and lumberyards.
The only challenge in hanging the SmartSide sheets is accurately cutting out for switch and
outlet boxes. Unlike Sheetrock, where a big "whoops" can be repaired with joint compound, a big
"whoops" with SmartSide will probably mean cutting a new panel. If your box cutout is too small,
drywall allows you to trim while holding the sheet in place...not this product. You will be taking
it down and carrying it back to the workbench. Measure three times and cut once!
Because the big sheets have shiplap edges, it is important that the corners, wall/floor junction,
and ceiling/wall junction be square. If not, use shims at the bottom and hang the sheets square.
Pay particular attention to the first sheet, otherwise the out-of-square condition will get harder
and harder to correct the further you move down the wall.
It is also important to plan ahead. Start in one corner and move progressively so that there are
not two cut (non-shiplapped) edges that meet. Place the cut edges only in/on corners.
As mentioned previously, the product comes primed. The one I picked is a light tan color. It
should be painted, and if I was using the product outside, I would paint it immediately, including
any cut edges and any edges that may be exposed to water. But since I am using the product as an
interior wall covering, I can wait. In my last shop, I never painted it, and it looked as good the
day I moved out as the day I put it up.
The new shop space will have electric baseboard heat for what I call "idler" heat – that heat
necessary to keep the shop above freezing in winter – and direct infrared heat for work (play) time.
The baseboard heaters I ordered are rated for direct-to-drywall contact and direct-to-floor
contact, even over carpet. Still, I am a careful sort, so I contacted LP's customer service. They
were quick, efficient, friendly, and helpful. They advised that installing the baseboard heaters
directly to their siding product would be fine.
The
video
("Garage Shop Conversion, Part 3 – Wall Covering") shows me cutting, wrestling, and
attaching some of the siding. With just one corner of the shop (half the length of two adjoining
walls) finished, I can already tell a difference. The shop is brighter, tighter, and quieter...can't
wait to get the rest done!
After the interior siding was installed, I could finish the electrical for each finished section
of the walls by installing outlets, switches and cover plates. Since for space reasons I am working
on one corner, or quadrant, of the garage at a time, installing switches and outlets at this point
is more an aesthetic than practical matter. Most of the circuits continue on to the next quadrant
of the shop, so most wiring runs are not complete and it would be premature and maybe even unsafe to
tie these partial runs into the breaker box. Still, wiring up the outlets and switches gives me
something to do when I have only a few minutes or just feel a need to move the ball forward on a day
when I really can't do any extended work in the shop.
The
video
("Garage Shop Conversion, Part 4 – Finish Wiring") shows me wiring an outlet that is part of a
larger circuit and a switch that will control (future) lights upstairs in the shop. Make sure you
follow your local code recommendations, make sure everything is properly grounded, and if you have
any doubts, call an electrician.
I'm definitely overdoing the electrical in the Down To Earth Woodworking Shop. In Hollywood they
say you can never be too rich, too thin, or too tanned. In my shop, there can never be too many
outlets, lights, or electrical capacity. When finished, I hope to never need an extension cord or
plug strip again. I hope to never again pop a circuit breaker, and hope that there is never again a
need for supplemental work lights or flashlights.
|
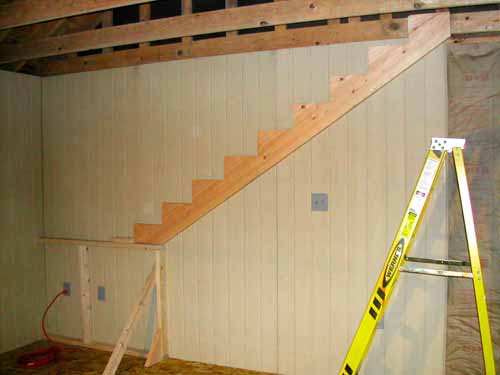
Figure 14 - After cutting one stair stringer, a scrap wood brace
holds it in place to double-check the design and measurements.
|
With the initial quadrant, or corner, done, I can finally build the stairs to the upper level.
Once that is done, the upper level reinforcement and decking can be done, and a lot of the "stuff"
cluttering my shop can be moved up and out of the way. Just that will speed up the rest of the
conversion project.
Be sure to get up to date next month when we cover a flurry of progress in the new Down To Earth
Woodworking Shop. The shop gets its new door, the stairs are finished, the upper level gets
reinforced and partly decked. A couple of new windows are installed (ah, come on sunshine and warm
weather!...please!) and at least one electrical circuit gets finished and connected to the breaker
box. Watch for new videos outlining each step and see some of the tips and tricks I learned. The
shop is shaping up and I am anxious to get my machines out of the storage pod. Stay tuned!
(Page 4 of 4)
Previous Page
1
2
3
4
Steven Johnson is recently retired from an almost 30-year career selling medical equipment and
supplies, and now enjoys improving his shop, his skills, and his designs on a full time basis
(although he says home improvement projects and furniture building have been hobbies for most of his
adult life).
Steven can be reached directly via email at
sjohnson13@mac.com
.
Return to
Wood News
front page

