
 by Steven D. Johnson
Racine, Wisconsin
(Page 3 of 3)
Previous Page
1
2
3
Building the NEW Down To Earth Workshop, Part 3 – Stairs, Door, Windows
It has been a month of "fits and starts" in the new Down To Earth Woodworking shop. We all know
that unforeseen problems can cause delays, and a series of daylong soaking rainfalls produced a wet
spot on the concrete floor in one corner of the garage. A little investigation revealed an
extensive drainage problem that required immediate remedial action. After digging around the
perimeter of the shop, lugging several thousand pounds of stone and gravel, digging a ridiculously
large hole and installing a dry sink, and installing new gutters and what seemed like a mile of pipe
to divert the runoff, the problem seems permanently resolved. It's raining again now, so I have my
hammer-damaged fingers crossed.
|
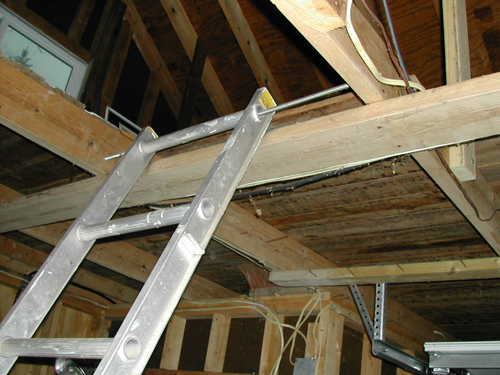
Figure 4 - The old "ladder-stairs," the siding used as
decking, and some of the old bird's nest of wiring.
|
Despite this "draining" distraction, considerable progress has been made in the garage-to-shop
conversion project. As you may recall, I started in one corner by rough wiring, insulating, and
eventually covering the walls. With very little "elbow room" my plan has been to convert/finish
this corner first, build stairs to the second level, and thus be able to relocate some items from
the first floor to the attic level and free up some workspace.
Building the stairs started with a sketch and calculations for rise, run, tread depth, and riser
height. If you have never built stairs before, it is really easy once you understand the basics.
If you want to make it really easy, buy a Construction Master 5 calculator from Calculated
Industries or download their iPhone App from the Apple App Store. Construction Master makes stairs
a one-button calculation. Simply enter the floor-to-floor total rise, and then repeatedly push the
"Stair" button to step through riser height, number of risers, tread width, number of treads,
stringer length, angle of incline and total run. You can then manually adjust many of the
measurements. For example, you can override/enter a different figure for total run, then push the
"Stair" button again and step through the revised calculations. Everything will adjust
automatically for the newly entered parameter.
I wanted wide, sturdy stairs and the design called for a landing part way up and a 90-degree turn
to the right so that the last step off the stairs at the top would put a person directly under the
highest point below the roof.
Landings and turns in a staircase can be intimidating, but really, they are easy. A mid-point
landing, for example, is simply another step, just larger. The only "noodling" required is to
figure out which step will be substituted with the landing platform. After doing some pencil
calculations, I decided that my fifth step should be at the landing and turn. I then used the
floor-to-landing rise and the landing-to-second floor rise to calculate as if I was building two
sets of stairs, and the numbers checked out. Time to cut stringers.
|
Figure 5 - Test fitting the first stringer and a double-check
on the design height of the landing...looks okay.
|
A carpenter's square and a pair of stair gauges are all that are needed to draw stair stringers.
Stair gauges are inexpensive but in a pinch, you can even use a pair of small "C" clamps. The idea
is simply to promote repeatability. Attach the stair gauge at the riser height on one leg of the
square and on the other leg of the square set the tread depth. Lay the carpenter's square on the
work piece and draw connecting lines. Align one leg of the square with the last mark, and draw the
next step. Keep doing this until the correct number of steps have been laid out.
I cut the first stringer using my circular saw and finished off each cut in the corner with a
jigsaw. I knocked together a temporary stand the height of the landing and test fit the stringer.
After confirming a good fit, I used that first stringer to mark out three more. I decided to cut
the rest of the stringers with just my new Festool jigsaw (see the review in last month's column).
This worked very well and speeded up the process. I think this is probably a safer technique, as
well.
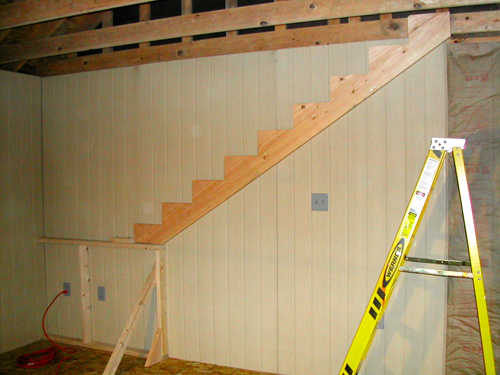
The next step was to build the landing. Essentially a large stud-framed and plywood-covered box,
my only design considerations were related to its size, sturdiness and its intended dual function as
storage for my air compressor and shop vacuum. I want air and vacuum hoses plumbed through the wall
of the landing and an access door that will help tone down the considerable noise these two machines
produce.
After building, or over-building, the landing and attaching it to floor and wall, I was ready to
start building the stairs. It may sound bizarre, but even on projects where a helper would be, well,
helpful, I enjoy the challenge of figuring out ways to do things alone. Clamps, of course, are key.
By clamping various braces and temporary blocks in place, I was able to assemble the upper
stringers in situ, align them, and secure them, top and bottom.
|
|
Figure 6 - The landing and the upper level stringers in place
|
Since what were ostensibly rafter ties are becoming second level floor joists, there was a
considerable amount of framing work to be done to support the top of the stair stringers. The job
took several days because it necessitated removing the former owner's second level decking, redoing
and removing some wiring, and some serious cleaning before I could start. Once everything was
ready, though, the actual framing work went quickly.
After the second level stringers were solidly secured, I moved on to the first level stringers.
Once again, I cut one stringer and test its fit before proceeding, then used it as a template for
the other stringers.
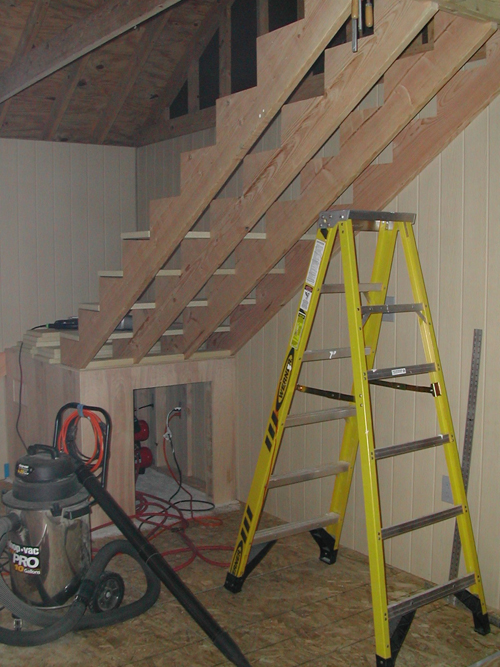
I used "prefab" 42 inch wide, 11 ½" deep, 1 1/8" thick particleboard treads for my stairs. The
cost was half that of pine treads, and I didn't have the time or access to the tools necessary to
glue up stock and make my own treads. If you are wondering why I would have 4 stringers for a 42"
wide set of stairs, the particleboard is the answer. I don't want to have any future sagging.
I debated long and hard whether or not to build the stairs with "open" treads or to install a
riser backing. The convenience of blowing and sweeping dust off open steps was the ultimate
deciding factor to leave them open. And, aesthetically speaking, it is a shop, after all!
|
Figure 7 - Old dysfunctional door,
siding removed and ready to uninstall.
|
Eventually I will install rake rails and balusters, but during the construction phase, open sides
make it easier (albeit less safe) to carry some things up the stairs. Ultimately, too, the stairs
will get a coat of finish, as will the landing...all in good time.
With the stairs built, I could finally turn my attention to reinforcing and decking what will be
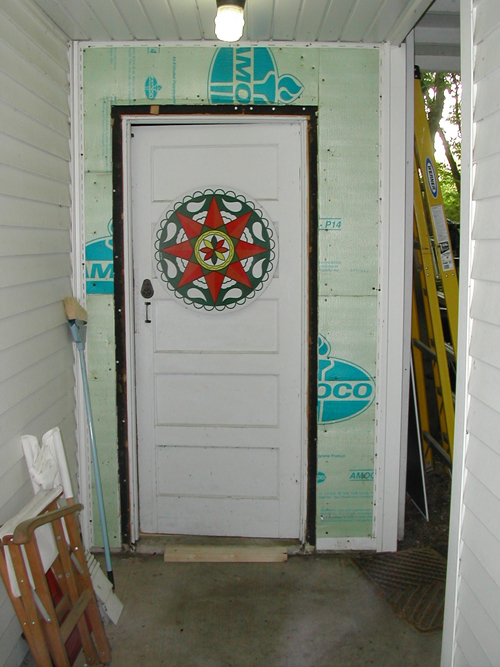
the floor of my attic/second floor storage area. But in the interim, my new door and a couple of
windows arrived, and I couldn't wait to get a little natural light and bug-free air into the
shop.
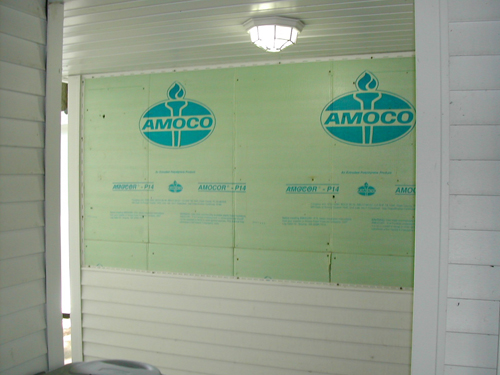
The old homemade door didn't work, and it was a pleasure to remove it. A little reframing to
accommodate the new, wider (36") door, and the installation went smooth and easy. Likewise for the
first window I installed. I removed the siding, framed the rough opening, cut away the wall
sheathing with a saber saw, and installed the window just as you would in new construction.
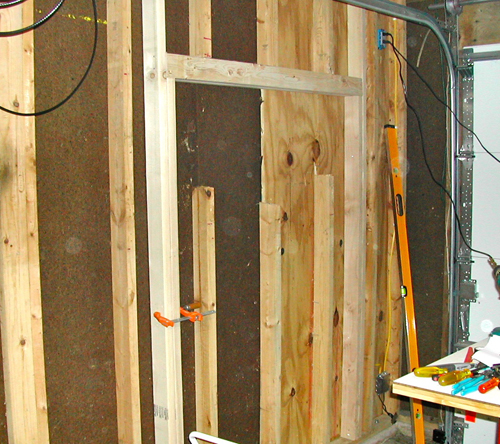
|
Figure 8 - Trimmer studs, new king stud, and header
installed. Next step is to trim the existing studs to length
so they become jack studs and then add the sill.
|
|
|
Figure 9 - Siding removed for window installation
|
After replacing the siding and cleaning up I felt industrious, and installed another small window
in the back corner of the garage. That will be the next wall I finish with insulation, interior
siding, and completed electrical circuits.
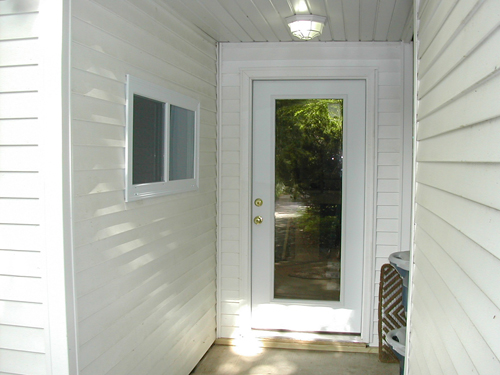
|
Figure 10 - The new door and window make the shop
much more inviting and provide some much needed
natural light inside.
|
The garage-to-shop conversion is about 50% complete now, and we have posted a mid-project
progress video on our YouTube site. Click here to view.
The next phase is big, and very important...removing the garage door and building a wall to
replace it. There will be a 60" wide double outswing door and a 5 foot long window in the new front
wall of the shop if everything goes well. Soon after, I should be able to start unloading the
storage pod and placing equipment in its new Down To Earth home. I hope you will follow along next
month as the new Down To Earth Woodworking shop starts to take shape.
(Page 3 of 3)
Previous Page
1
2
3
Return to Wood News front page

