 by Steven D. Johnson
Racine, Wisconsin
This month:
•
Speedy Building – Time-Saving Tactics
•
Mobile Sanding Center - Box Joint Drawers Out Of Plywood! (Really?)
•
Some Follow-Up Notes – Reader Comments, Questions, Admonishments
Speedy Building
Click on any picture to see a larger version.
|
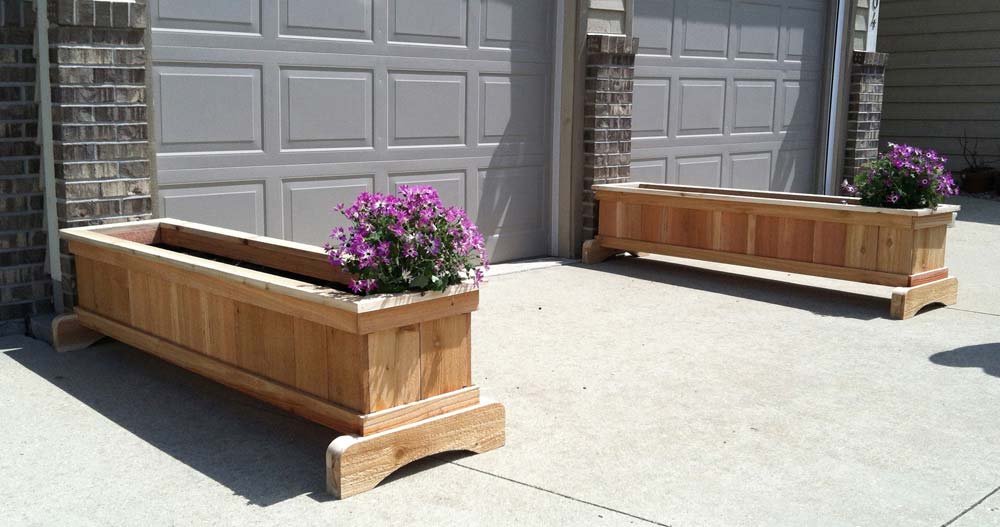
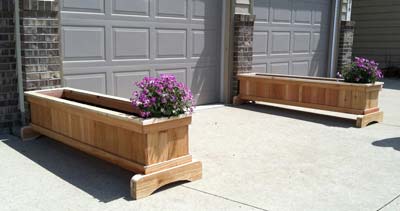
Figure 1 - Could I preserve family harmony and
build these planters in three days?
|
It was Sunday, a week before Mother's Day, and my mother-in-law casually mentioned she would like to have two six-foot long planters to frame either side of her driveway. I looked briefly at the spots where she wanted to place them and promptly forgot all about it.
It was late the Tuesday evening before Mother's Day, my spouse was out of town on business, and I had just settled in for a quiet night with some re-heated leftover when my wife called and asked, "What are you doing?" Whatever my reply, it wasn't quite right. She commanded, "You better get to work on those planters for my Mom… those are going to be her Mother's Day present."
Now, how big did she want those planters? I was designing in my head as I drove to the big box store Wednesday morning, with nary an idea of what materials I might need or find. All I knew for sure was, I better work fast.
Working fast, of course, should never entail working carelessly. Safety should always be a primary consideration, so never let the need for speed supersede commonsense precautions. There are, though, some easy ways to save time and be more efficient.
Avoid Multiple Trips To The Store
Perhaps the first and most important step in saving time in the workshop is to make sure you have everything you need. My closest big box store is almost an hour away, so if I forget something, buy a little too little lumber, or change my mind, it is a minimum three-hour round-trip excursion for more supplies.
For two six-foot long outdoor planters and my typical cost constraints, I knew that the selection of wood at the big box store would boil down to a handful of choices: (a) Hem/fir lumber, that nebulous sort of "mixed breed" wood classification that translates, as we all know, to "horrible" and that would have to have multiple coats of finish to protect it from the elements. Not enough time for that! (b) Pressure treated lumber that would probably be toxic to plants and maybe me. (c) Fake wood (plastic trim, faux-wood deck boards, etc.) that would certainly hold up in the weather, but is too heavy and too expensive. (d) A small assortment of dimensional hardwood, grossly overpriced and of questionable quality. And perhaps, just maybe, if luck, the sun, the moon, and the stars were aligned, (e) some cedar. Naturally bug and decay resistant, light in weight, aromatic, and no real need for a finish --- that would be just right!
Wandering the stacks, I found the dimensional cedar, a rather haggard collection of 2 X 4s, 1 X 4s, and a couple of pretzel-shaped 4 X 4s. Hours at the jointer, planer, and table saw, a $500 receipt (at least), buckets of cedar mulch and a nice fresh smell in my shop would probably be all I would have by Mother's Day to accompany the card that would essentially say, "We love you Mom, but your gift isn't ready yet." An unacceptable alternative.
Between the cavernous racks of lumber, in proximity to the stacks of pre-built fence panels, a guy was digging through a stack of something… he was huffing, puffing, and struggling a bit. Just as I walked by, the precariously unstable stack fell, spilling out into the aisle.
I started grabbing boards and helping him restack them. They were light, slightly wet, and smelled good. We started talking. He told me that he had been buying a few of the better of these pre-cut cedar fence pickets to make birdhouses. These were rough sawn boards, but they were a full six inches in width, the edges were fairly straight, they were 9/16-inch thick and six feet long, including a little dog-ear cut at one end, and, most importantly, they were cheap.
The wheels started turning. After my new birdhouse-building friend wheeled off his stack of carefully selected boards, I started picking through the pile. A half hour later, I loaded a stack of fence pickets into my truck along with a couple of the dimensional cedar 1 X 4s. Gosh, I hope I got enough!
During the drive home, I was designing in my head. In order to make the deadline, I would need a simple design utilizing simple joinery. More importantly, I would need to use every time saving trick I ever learned.
Materials Drive The Design
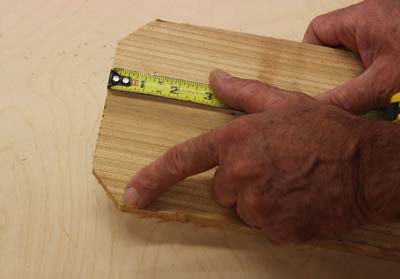
|
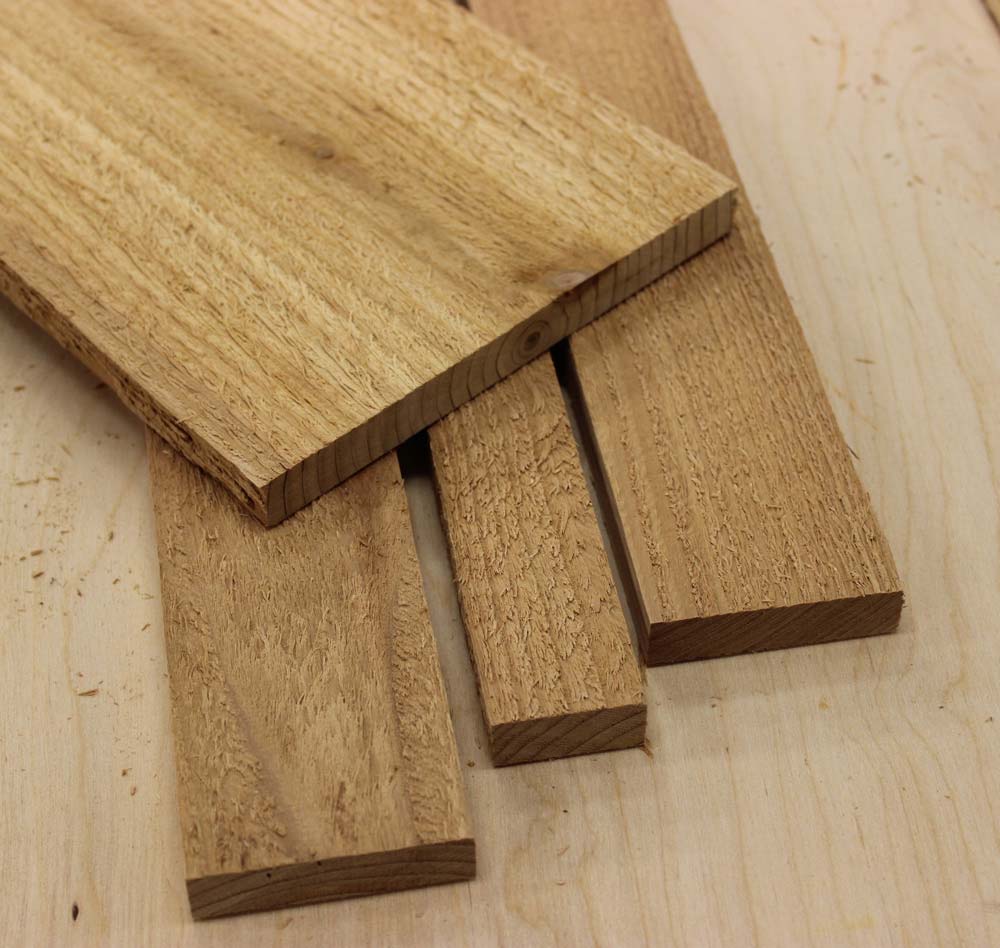
Figure 2 - After removing about
1-1/4" to square the dog-eared end,
and removing the labels and
squaring the other end, the fence
pickets were still about 70" long.
|
These days I am more likely than not to sketch a piece of furniture, then let the design drive the choice of materials. With a deadline, a budget, and the wood in my truck, the materials needed to drive this design. She wanted six-foot long planters, but removing the dog-ears from the fence pickets and squaring the other end would leave about 70-inch pieces. That would be "close enough." The pickets were 6-inches wide. Where possible, the more I could incorporate dimensions in multiples of 6-inches, the less ripping would be necessary. There was no thick material, so I would need to double or triple up the 9/16" thick boards for certain parts, yet I needed to be somewhat frugal… there was no way I would have time to go back for more wood. The cedar was pretty wet. As it dries, it will shrink… another design consideration. Rough sawn cedar has its own unique visual appeal, but the rough surface is not ideal for gluing. Planing all that wood would just take entirely too long, so I would need to hide some nails here and there. In fact, carefully gluing subassemblies would require waiting time for the glue to set, so I would need to use nails instead of clamps to keep the assembly moving along. My head was starting to hurt.
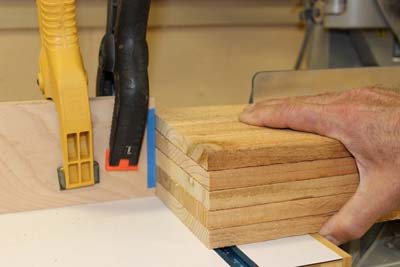
Gang Cutting
|
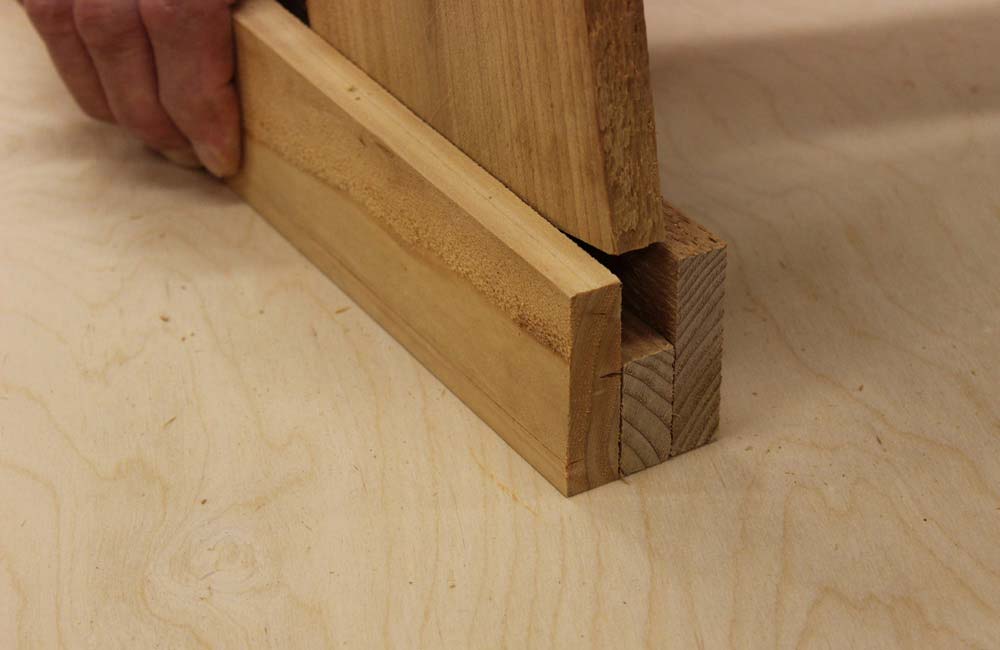
Figure 3 - "Gang" cutting boards is perfectly okay,
just remember that the offcut end must be free
(not trapped), the stack should never exceed the
height of the fence, hold on tight (or use a clamp),
and stand clear of any potential flying offcut!
|
As soon as I backed the truck up to my shop, I carried the fence pickets straight to the miter saw station. In more leisurely times, I would have staged the boards on a work surface and carefully resorted them into "good, better, and best" stacks. I would have used needle nose pliers to remove those annoying stapled-in barcode tags on the end of each board. Instead, I squared together five boards at a time and cut off about 1/2" from the end. This cut safely cleared the staple, removed the ragged end of the board, and gave me one clean square cut to start with.
After the price tags were all removed, I set up a stop block and cut off the other end of all the boards, just enough to remove the little dog-ears at the end. For this operation, I cut three boards at a time. When I was finished, I had a stack of boards all just a bit shy of 70-inches in length.
As long as just one end of a stack of boards is against a stop block and the other end is not "trapped," it is safe to cut multiple pieces at the same time on a miter saw. However, when removing short pieces at the end of a board, the saw blade can kick those small pieces back, especially when cutting multiple pieces at the same time. Be sure to stand well clear while cutting, on the side opposite of the off-cut piece. And wear your safety glasses! When gang cutting, the stack of boards should never exceed the height of the fence, should be well supported along their full length, and must be held firmly in place.
Gang Inspection
Even though I did my best to sort through the boards at the store, not every piece was good. With all the boards now cut to the same size, I turned the stacks so that all the boards stood in a group on their long skinny edge atop a flat work surface. A few of the boards were obviously standing up higher in the middle or higher on one end or the other. I plucked those boards out of the stack and set them aside. I would still use them, but would certainly not try to rip them at the table saw.
Next I fanned the remaining boards like a card player might spread his cards. My mind's design called for ten of the best boards to be ripped to width, and I was looking for minimal knots and boards that were closer to rift-sawn or quarter-sawn than flat sawn. This thin wet stock could be dangerous to rip, particularly if flat-sawn boards with internal stresses induced kickback. After plucking out a few more rejects, I flipped the stack over and examined the other side of the boards. A few more went into the reject pile, and I wound up with about a dozen good candidates for the next step.
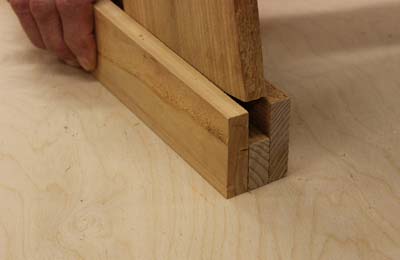
Minimum Tool Set-ups – Minimum Cuts

|
Figure 4 - All three parts of each built-up rail cut
from a single board. Less time, less waste!
|
Constantly adjusting fences and changing set-ups is needlessly time-consuming. My mental design called for simple frame and panel construction using rails built-up from thinner material rather than thick stock with a groove cut to receive the panels. With 6-inch wide material, I decided to rip from each board two pieces 2-1/4" wide, leaving a piece about 1-1/4" wide (the rest was eaten up by the saw kerfs). I would then sandwich those three pieces together with the narrower piece in the middle and three edges flush to make a built-up rail with a groove in the middle the exact thickness of the stock.
Doing this would yield one full built-up side rail from each board, and I would needed eight of these for two planters. I would also need some of the same size stock to form the top and bottom rails for the ends of the planters, so to make sure I didn't need to return to this set-up, I ripped ten boards.
Let the Boards Hold the Boards
|
Figure 5 - The built-up rail provides a perfect size
notch for the panel stock. A real time-saver!
|
Normally I would allow the stock to relax a bit after ripping or stack and sticker the pieces to keep them straight, but there was not time. I immediately sandwiched the sets of three boards with a dollop of glue and a few strategically placed brad nails from a pneumatic nail gun. To make sure any internal tensions in the boards were negating one another, I flipped the narrower board and one of the wider boards end-for-end before I joined them together. After all the rail stock was made, I clamped all eight long rails together to provide further resistance to warp while they rested and I moved on to the next step.
Material Dictates Design (Again)
All the remaining flat boards were just shy of 70-inches in length. I wasn't really locked into a height for the planter boxes, figuring a foot deep or so would be sufficient for flowers. Because I needed to cut as many panels to fill the rails as possible from each board, I decided to make the length 9-7/8". With the saw kerf, I was able to get seven panel boards from each 70" long board. Like with the original stock, I set up a stop block and ganged the boards to make multiple cuts at the same time. Just to get a quick mental estimate, I figured twelve panel boards per side (each 6 inches wide, rails 70" long, equals about 12 boards per side) for a total of 48 panel pieces. Then I figured I would make the end panels about 16 inches wide, so to be safe, I figured 3 panel boards per end, for a total of twelve more. So I needed a total of 60 panel pieces. At 7 per board, I decided to cut up 9 boards, giving me a total of 63 panel boards. At least a few pieces were sure to be culled, and of course they were.
Self-Squaring Clamp-less Assembly

|
Figure 6 - The side panels went together easily,
perfectly square.
|
Because the panel pieces were all cut square on the ends, because the rails were long enough and the fit of the panels in the formed grooves was tight enough, there was no reason to worry about the final assembly of each side panel being square.
I placed 6 panel pieces in the bottom rail, starting on the left hand end. Then I placed 5 panels starting at the right hand end. The resultant gap in the middle required that I rip one panel to fit. Each middle panel for all four sides was cut to specific size.
Because I was worried about shrinkage of the wet boards, I did not use glue to assemble the panels and rails. Instead, I shot one brad nail through the rail and through the center of each panel piece. The side panels consequently went together in minutes instead of the usual hour or more for assembly and glue set-up time.
The end panels for the boxes were fabricated to fit. The upper and lower rails were built just like the side rails, with the exception being that the inside part of each three-piece rail sandwich and the middle filler piece was cut a bit shorter (the thickness of the fence picket times 2 on each end) so that there would be an overlap and interlock on the corners made by the extension of the outer end rail piece.
The panels were quickly notched with a jig saw to accommodate the inside of the side rails and the end panels were assembled and attached to the boxes at the same time. A quick corner-to-corner measurement assured that the boxes were square.
One Last Gang Cut
At this point, the boxes only needed bottoms. Several of the remaining fence picket boards were cut in pieces to fit from edge to edge, crosswise, along the inside edge of the bottom rail. These boards, too, were nailed into place, but first I ran a thick bead of Titebond III along the length of each rail ridge. If wood movement causes a bottom panel to split, okay… It won't show, the planter needs some drainage anyway, and I would rather add some rigidity at the bottom to hold an estimated hundred pounds of soil.
I did take a few minutes to determine the grain orientation of each bottom panel piece, making sure that any future warping created a crown rather than a cup… in other words, I placed all the boards bark side down. I figured that any planter needs a way for excess water to drain out, which was assured by holding a very small spacer between each board before nailing it into place. But I also figured that as the boards warp, a crown would assist in water drainage as opposed to a cup in the board that would potentially collect water.
Finishing Up
By this time, excluding the time spent going to the store, I had about five hours invested in these cedar planters, and other than some details, they were essentially finished. Before calling it a day, I slowed down, took a few deep breaths, and did some fun stuff.
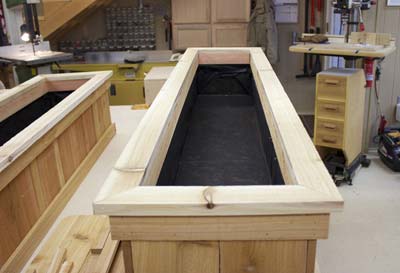
|
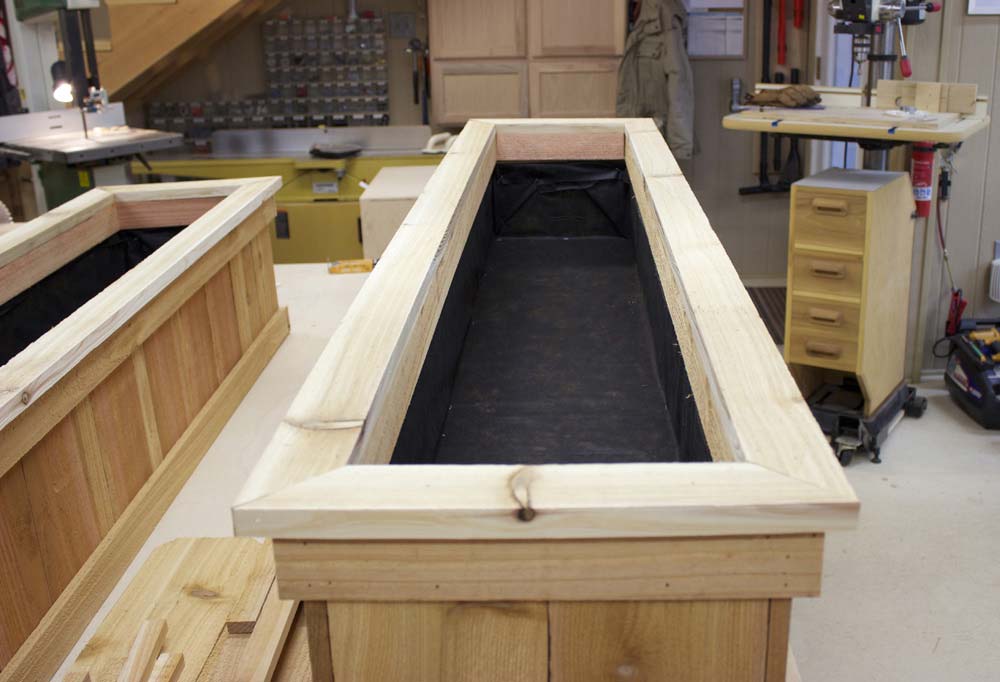
Figure 7 - The top cap was made from dimensional cedar,
which was planed at the mill. It looks a little different right
now, but after a couple of weeks in the sun and rain, it will
blend right in. Note the black landscape fabric stapled inside.
|
First I cut and individually fitted mitered top caps around the boxes, ripped from the cedar one by fours. I clamped and glued these into place so that no nails would show. What was left of the one by four stock was edge jointed and glued together into panels 6-inches wide. I would use that tomorrow. Then, with that glue-up drying, the shop got a thorough cleaning and I got a well-deserved glass of wine. In a creative moment, I sketched a curve and cut out a paper template for the planter stands. Please note: A pair of scissors is about the only "tool" I would ever use after a glass of wine!
Thursday Morning
First thing the next morning (well, after a couple of cups of coffee), I cut eight pieces from the edge-glued panels I made from the 1 X 4s and glued them in pairs, face to face, to double their thickness. While those pieces sat in clamps curing, I ran to the garden shop and purchased a roll of inexpensive landscape fabric. This was used to carefully line the inside of each planter. A single piece covers the bottoms and the sides, right up to the top rails. The fabric was stapled into place with proper military-spec folded corners and nary a wrinkle. I used a staple gun and 3/8" stainless steel staples.
With the doubled-up edge-glued panel pieces now dry, I cut a notch in each the width of the planter and about 1-3/4" deep on two, and 3/4" deep on the other two. After the notches were cut, I used the last bit of rough-cut fence panel material and cut a solid face piece to glue over these support brackets, making a three-piece sandwich. When that dried, I traced my curve pattern onto the face of each piece and cut curves on the band saw. A little quick touch-up on the oscillating spindle sander, and they looked okay. So you may be wondering, why did I make the notches 1-3/4" deep on two of the supports and only 3/4" deep on the other two? Because I "guessed" that my Mother-In-Law's driveway sloped about two inches every ten feet, and the one-inch differential would hopefully be enough to make the planters sit close to level. The fact is, I got lucky, and when I delivered the boxes and attached the base support pieces, the planters were almost perfectly level.
Mother's Day
The planters were both a hit and a surprise. Mother-In-Law was shocked and impressed that I built these in just a week. Truth is, it took just a day-and-a-half using some proven methods to save time. The next time you need to build something in a hurry, remember the keys: Minimize trips to the store and get everything you need. Make "gang" cuts when it is safe to do so. Let the material drive the design. Use simple joinery and use nails to hold glue-ups together instead of clamps so you can keep building. Above all, save time through technique and design, not by rushing!
(Page 1 of 3)
1
2
3
Next Page
Return to
Wood News
front page