 by Steven D. Johnson
Racine, Wisconsin
This month:
•
Wednesday Tools & Friday Tools – The Rikon Combo Belt/Disc Sander
•
Sheet Sandpaper Organizer & Storage Unit
•
Bittersweet Endings
Wednesday Tools & Friday Tools
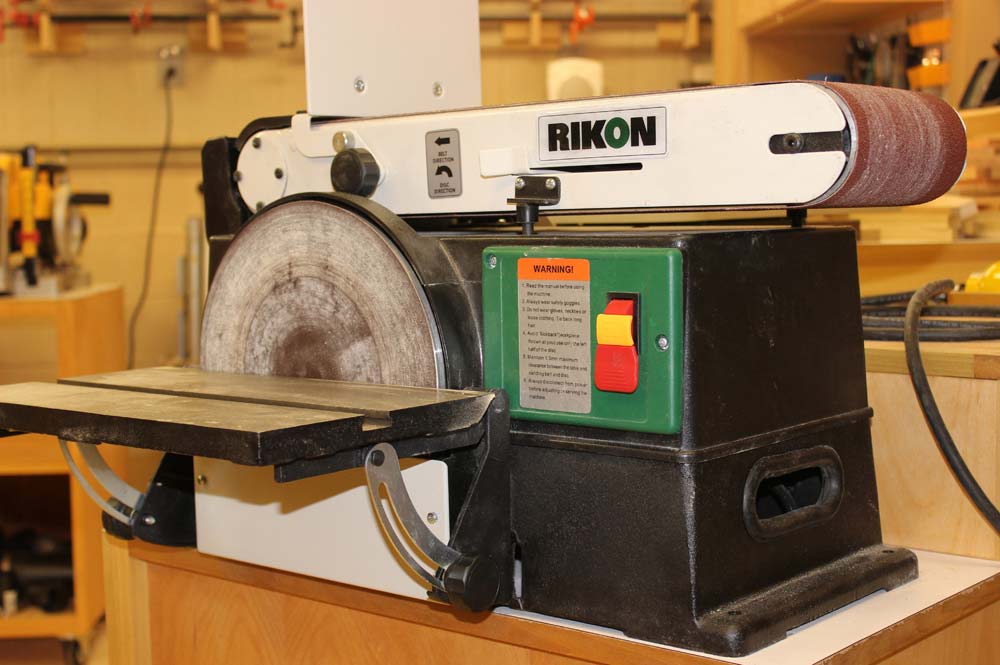
The Rikon Model 50-120 Combination 6" Belt, 10" Disc Sander
Click on any picture to see a larger version.
The album was called "The Rambler," and he could have been thinking of the car, when in 1977 Johnny Cash wrote and crooned and perpetuated the conventional wisdom that a car made on Monday or Friday was sure to be a lemon, and a car made on Wednesday was sure to be good.

|
Figure 1 - The handwritten
lyrics "A Wednesday Car" by
Johnny Cash sold for $1600
|
The assembly line is runnin' slow on Monday
They've been livin' it up and layin' up Saturday and Sunday
On Tuesday they're about to come around
But they still feel bad and they're kinda down
And mad cause they've got four more days before the weekend rolls around
On Wednesday they're feelin' fine again
And they're workin' like a dog and diggin' in
Tryin' to do everything they should puttin' 'em cars together good
And I got me a car that was made on Wednesday on Wednesday
If you're gonna buy yourself a new car
You just better hope you're lucky enough to get one made on Wednesday
On Thursday the weekend is in sight
And they're in a hurry and they don't do nothing right
Friday is the worst day of the week that's the day they make lemons dogs and freaks
If your car was made on Friday friend you'll soon be in the creek…
… "A Wednesday Car" by Johnny Cash
That song runs through my head sometimes when I read chat-room and blog reviews of equipment and tools. You see I trust woodworkers and I know they would not tell a fib. So it must be a "Wednesday tools" and "Friday tools" phenomena, otherwise there is no viable explanation for reviews of the same piece of equipment that range from "I love it!" to "I hate it!"
As I unboxed and prepared to assemble the Rikon Model 50-120 combination 6" belt/10" disc sander, (Highland Woodworking currently sells the
Rikon 4 inch x 36 inch Belt - 6 inch Disc Sander
) I wondered if it would be a "Wednesday tool" or a "Friday tool." Prior to making the purchase I read every review I could find, and the opinions ranged widely… as they did for all the similar competitive combo sanders. I could find twenty people that loved the sander and twenty that didn't. The manufacturers' descriptions of the Rikon as well as those of all of its competitors were unenlightening. I did a quick search and made a couple of phone calls and confirmed there was no combo sander, from any manufacturer, within a day's drive, so there was no chance to get a hands-on look. So with a leap of faith, a hopeful heart, and a pair of crossed fingers, I placed an order.
It should be noted that my decision to pick the Rikon was strongly influenced by the fact that I own the
Rikon 14" Deluxe band saw
. Whether that machine was built on a Friday, a Wednesday or on a Chinese holiday doesn't really matter. It is simply one of the best-built, smoothest running, and most accurate pieces of equipment that has ever graced my shop. This is an important caveat, because my experience with their band saw heightened my expectations for Rikon's sander… perhaps unfairly so… the comparison would likely make me a bit more critical.

|
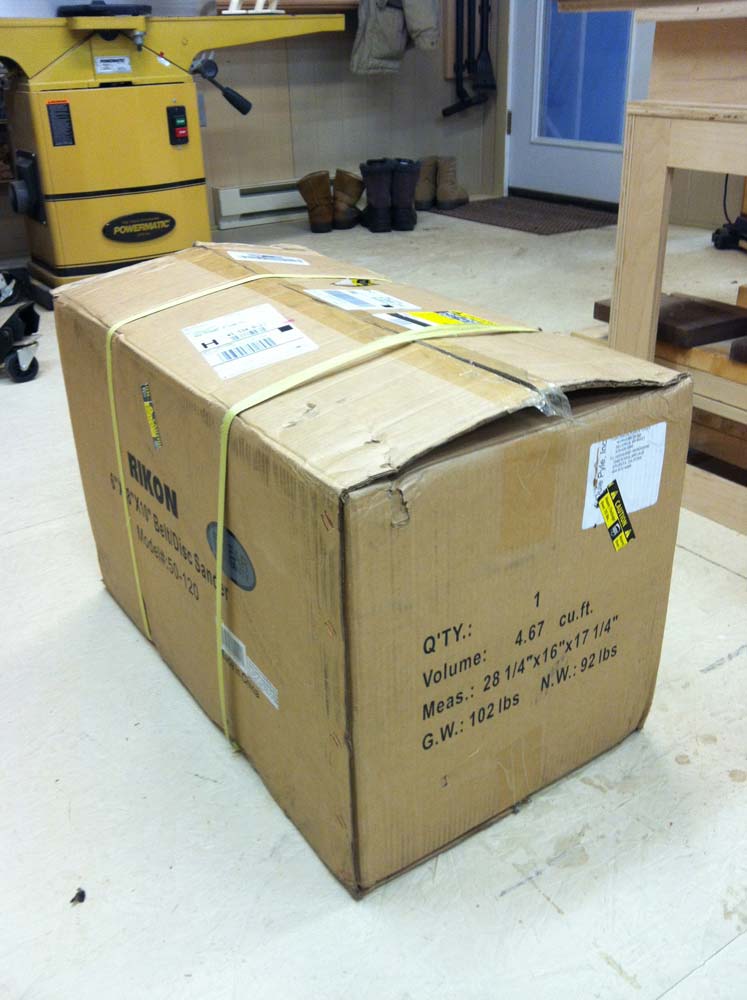
Figure 2 - The tape couldn't
hold it, but the banding did
|
The box arrived in just a few days, relatively unscathed. I'm not sure if the factory or Highland Woodworking added the banding straps around the box, but thank you! One hundred and four pounds in a box wreaks havoc on tape, as you can see. The banding held things together nicely. Inside, the factory packaging was reminiscent of that of my band saw --- sturdy heavy-walled box, molded Styrofoam, plastic-wrapping, sealed parts bags, and a generous coating of oil on any parts that might rust. So far, so good.
Like many manufacturers, the instructions for assembly and use were available on the Rikon Power Tools web site
www.rikontools.com
and I had printed and reviewed these prior to delivery. As it turns out, my printed PDF version of the manual was better quality than the manual in the box. The pictures were sharper, the print easier to read.
The machine net weight, as listed in the specifications, is 104 pounds. The parts that get added during the assembly represent 20+ pounds of that total. If you are working by yourself, place the machine where you want it before assembling and adding on those extra pounds.

|
|
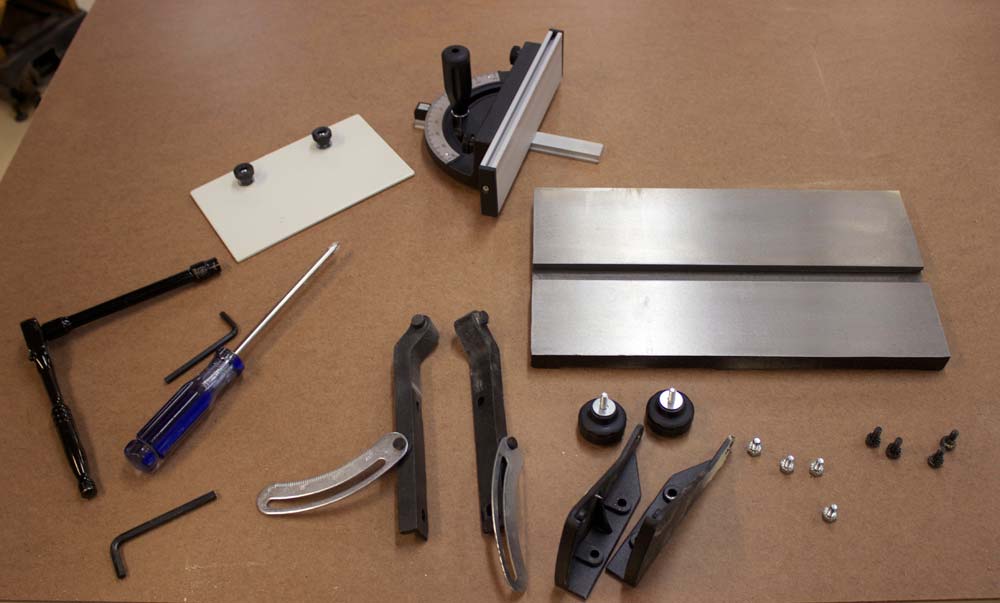
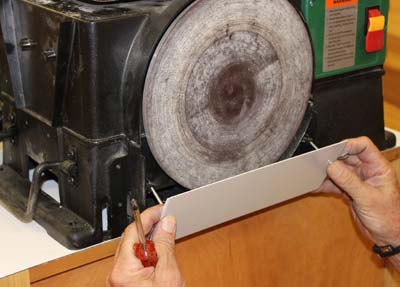
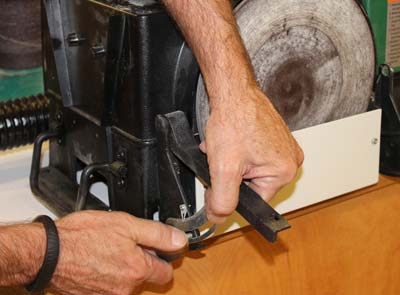
Figure 3 - To install these parts use a #2 & #3
Phillips head screwdriver and a 10mm socket wrench
|
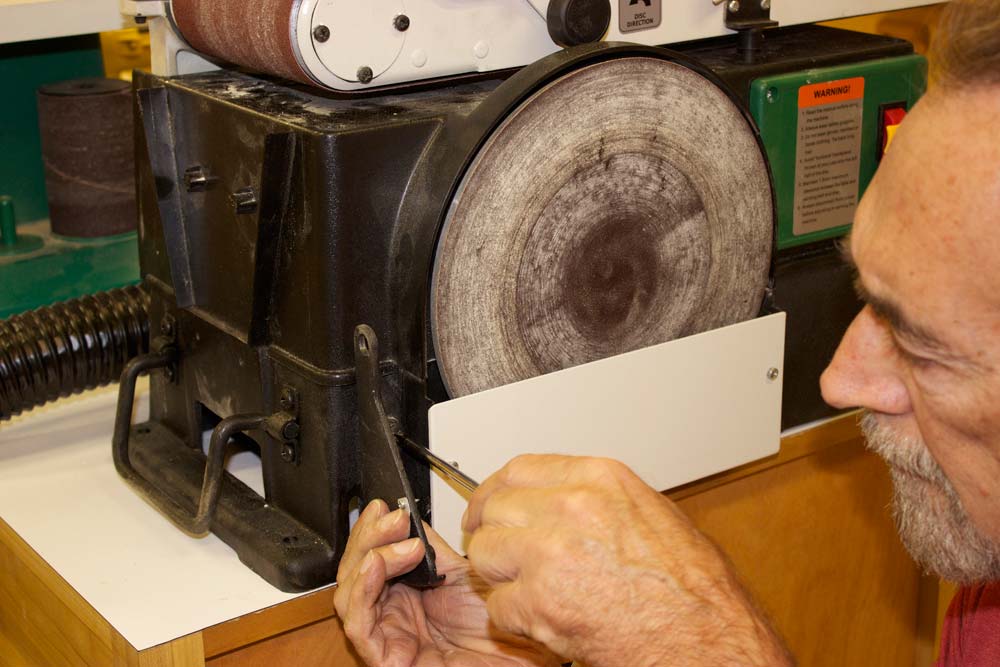
Figure 4 - Two long screws hold the
disc guard plate in place
|
The first assembly step is to install the 10" sanding disc. The instructions do not mention it, but it is necessary to remove the disc guard plate. The screws are very long and extend through a plastic housing and into the cast iron base. Again, the instructions make no mention, but it is a good idea to clean the sandpaper disc platen before installing the adhesive-back sanding disc. I used mineral spirits.

|
Figure 5 - Installing the left table support mount.
Note the table angle pointer under my finger.
|
After reinstalling the disc guard plate, the next step is to install the belt table, or backstop, as I prefer to call it. There is really no logistical reason to skip to this as the next step, but hey, who am I to question? Installing the backstop is straightforward and easy, but don't go looking for the "wing nuts" the instructions describe. The assembly actually uses the M6 knurled nuts listed on the "Contents of Package" page of the instructions.
The instructions for installing the disc table and the accompanying pictures are not very helpful. The procedure, though, is pretty easy. There are two table support mounts, left and right. The "left" support is the one with the table angle pointer pre-attached. Two large pan head screws and lock washers secure the support mounts. After attaching the support mounts, the table support arms are attached by slipping the milled "axle" of the support arms into the holes in the table support mount and securing with two locking knobs.
|
Figure 6 - Table support arm attached
to the table support mount
|
The table attaches to the support arms with 4 hex-head bolts and lock washers. Three of the bolts went in easily, the fourth was a bit problematic. The threads in the table were either misaligned or cut poorly, so I had to use a metric threading tool and realign and clean out the threads for the bolt.
The instructions caution, and rightly so, that the table should be as close to the disc as possible… they recommend 1/16". This is important so that small work pieces or your fingers do not get caught between the disc and the worktable. Unfortunately, the closest I was able to get the worktable to the disc was almost 3/16". I began pondering whether to enlarge the holes in the table support arms or be extra careful.
The next step in the instruction manual covers the installation of the sanding belt, but my unit had a belt pre-installed. I was anxious to try things out, so I fired up the sander and was greeted with a level of noise and vibration that was quite unexpected and that simply sounded and felt "wrong." Remember, I have the Rikon band saw, and it runs so quietly that I have actually forgotten and left it running… more than once.
The belt was tracking okay, not rubbing, and no other parts seemed out of kilter so I decided to remove the belt and look further for the source of the noise. Removing the belt requires that the belt platen assembly be tilted up from its normal horizontal position and that the backstop, or belt table as Rikon calls it, be removed. To remove the backstop assembly, a knurled nut and the rod to which it is attached must be removed and two knobs must be unscrewed.
|
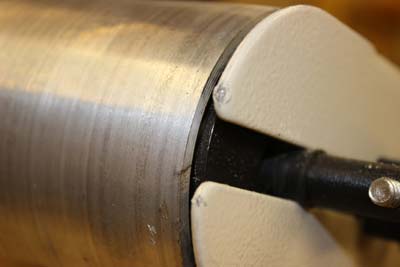
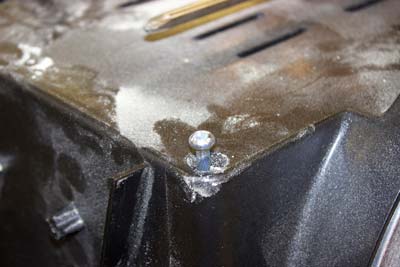
Figure 7 - The idler drum rubbing on the adjustment
mechanism was one source of noise
|
With the belt removed, I started looking for the source of the noise. The idler drum wheel for the sanding belt is adjustable for tracking purposes, and the inside of that drum was rubbing on the adjusting mechanism. I was able to disassemble and realign those parts and eliminate the rubbing. This was not a machine design flaw, or even a flaw in any of the parts --- this was simply sloppy assembly. It was beginning to look a little like my machine might have been built on Friday.

|
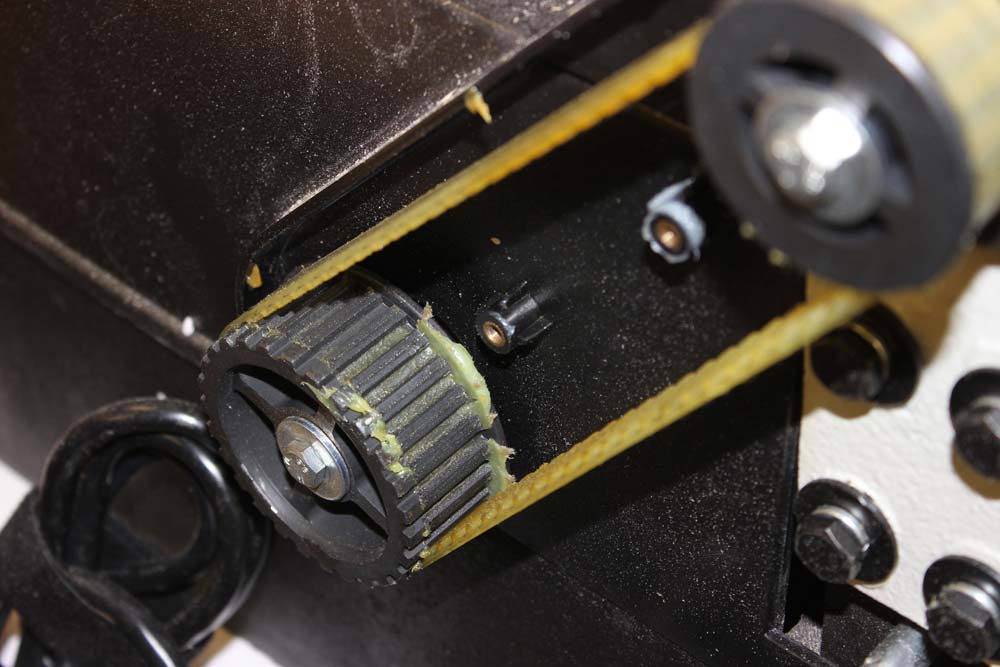
Figure 8 - Great gobs of grease!
What purpose does this serve?
|
As long as I had the machine about a third of the way disassembled, I decided to remove the rear cover and check the drive belt tension. Imagine my surprise when I saw large gobs of grease in, on, and around the belt and on the face of the pulley. Grease on an axle, absolutely… grease on a gear, sure… but grease on a belt or the surface of a pulley? With the unit unplugged (of course), I rotated the parts by hand and watched as the ribbed timing belt rubbed against the motor pulley. The belt would climb up the side of the pulley slightly, drop back into place, and repeat. At the factory someone apparently smeared a glob of grease onto the face of the motor pulley hoping to quiet the noise rather than realign the pulley correctly. It was beginning to look a lot like a Friday machine!
At this point I was forced to consider a major disassembly/reassembly project. The pulley attachment methodology is not such that its location on the motor shaft can be changed. Instead, the motor mount would need to be shifted to align the pulleys. I realized that shifting the motor rearward would not only bring the pulley into alignment, but would also move the disc forward, allowing me to properly position the disc work table and achieve the recommended 1/16" clearance (or less). So, mollified that I would at least be accomplishing two things, I started to disassemble the unit.

|
|
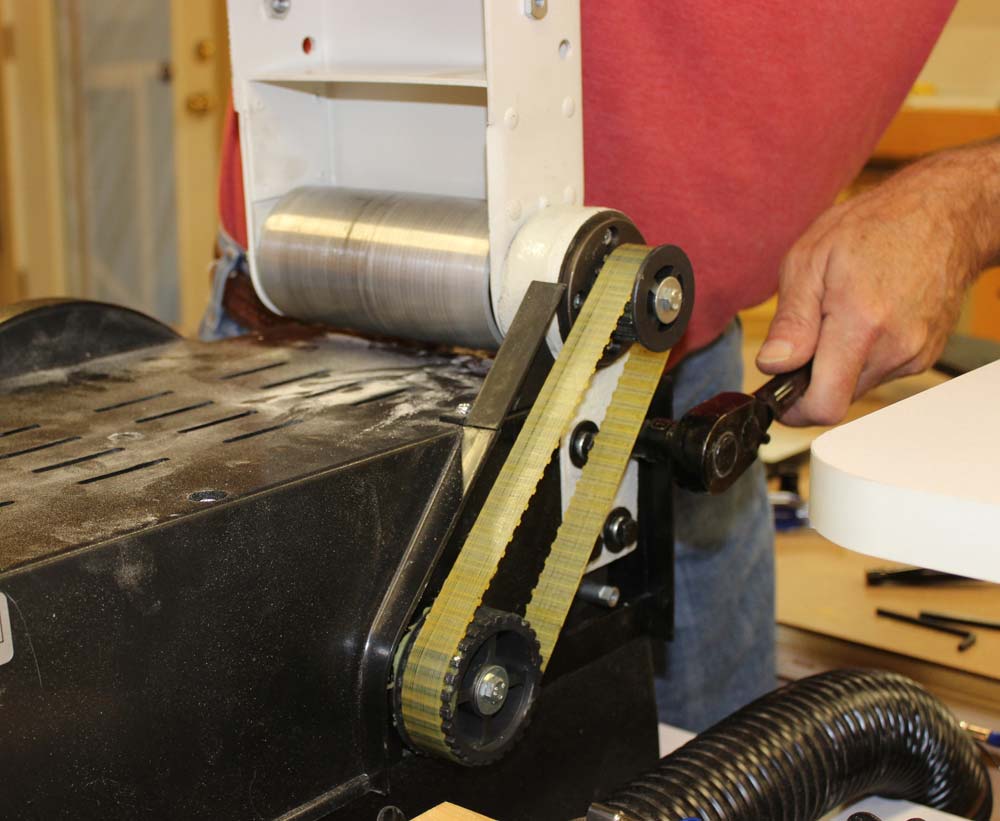
Figure 9 - Remove these 4 bolts and the
entire belt platen can be removed
|
Figure 10 - Six long screws hold the
cover to the cast iron base
|
Disassembly, as you might imagine, is not for the faint of heart. With the drive belt cover removed, the next step is to remove the dust shroud assembly at the end of the machine.
|
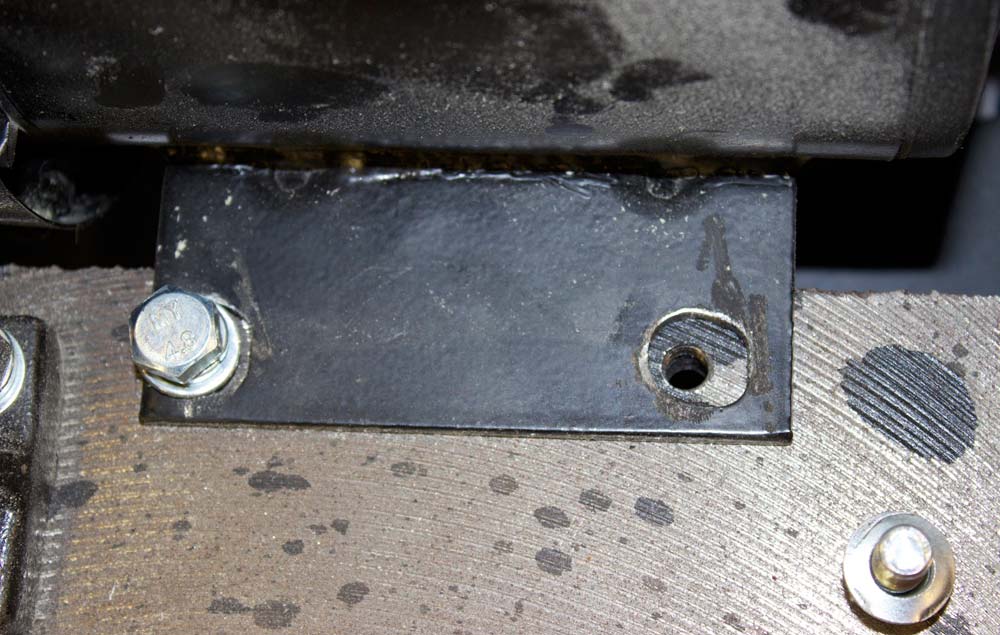
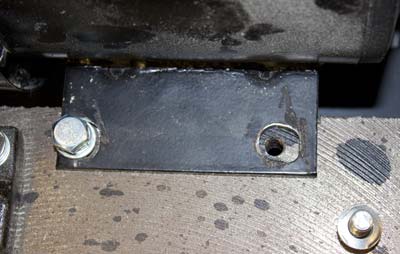
Figure 11 - Nice job on those motor mount holes...was
that an apprentice at work or was it just a "Friday thing?"
|
There are four large bolts on the back of the machine that hold the belt platen assembly. Loosen them to adjust the drive belt tension, remove them and remove the platen completely. There are six very long Philips head screws extending through the top cover and into the cast iron base. With those removed, the cover can be tilted up and out of the way --- at least enough to get to the motor mount bolts. I removed one bolt to see how much "wiggle room" there was, and there was plenty as you can see in the photo. I moved the motor in the direction of the sanding disc 1/8" and retightened the bolts.
Reassembly went very smoothly. I reattached the belt platen and adjusted the belt (a little looser than before) and retightened the bolts. The rest was easy.
|
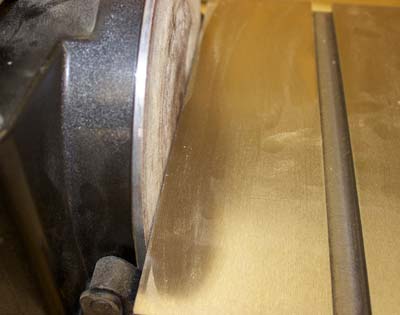
Figure 12 - With the motor moved back, the
disc-to-table alignment was perfect
|
With the motor repositioned by 1/8" the drive belt tracked straight and true on the pulleys. As a side benefit, I was able to adjust the disc sander worktable to a perfect 1/16" gap from the sanding disc. Before replacing the drive pulley cover, I plugged the unit in and check how everything was running and tracking. The belt tracked perfectly and the noise of the machine dramatically reduced. I just realized I was assembling (uh, reassembling) my new combo belt disc sander on a Wednesday!
With everything running much more smoothly now, I adjusted the disc worktable to 90 degrees, reattached the drive belt cover and started to make some tests.

|
Figure 13 - dB reading of 107
max and 106 average...
pretty loud!
|
I should have tested the sound level before rebuilding the unit, but the much quieter rebuilt unit clocked in at a still red-zone average 106dB. Like most machines in your shop, hearing protection is required.
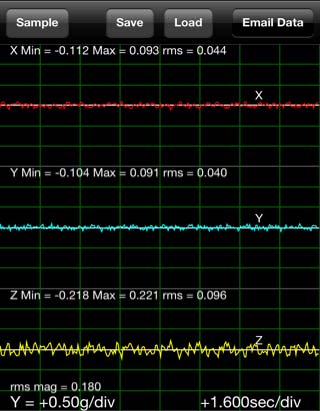
Of late I have become interested in the use of vibration testing for machinery. Vibration is a very good indicator of equipment build and component quality and provides a useful reference for how smooth a piece of equipment runs, how accurate it will be in use, and even how long it will last. For more information on vibration measurement,
CLICK HERE
to read a post I did about the topic on the Highland Blog.

|
|
Figure 14 - The Rikon 14" Deluxe Band Saw –
rms magnitude 0.094
|
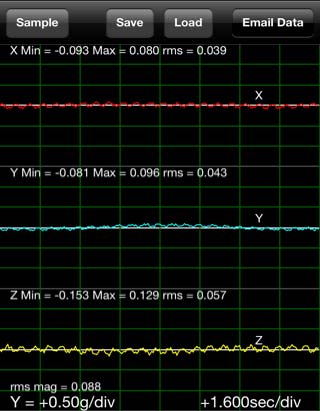
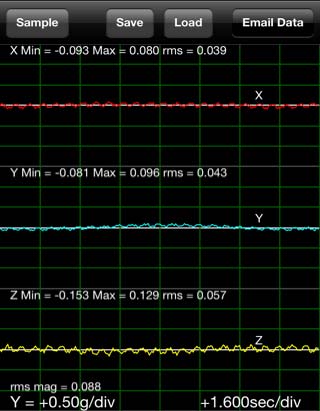
Figure 15 - The Powermatic 6" Jointer -
rms magnitude 0.088
|
|

|
Figure 16 - The DeWalt Planer -
rms magnitude 0.180
|
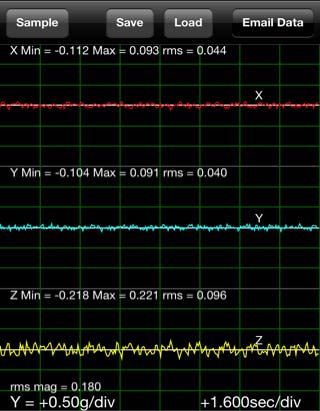
Figure 17 - The Rikon Combo Belt/Disc Sander -
rms magnitude 1.058
|
The rms magnitude number indicates that the smoothest running machines in my shop are the jointer and the Rikon band saw. The planer has double the vibration of either of those machines, and the new Rikon combo sander has six times the vibration of the planer.
It is extremely important to note that the accessories we attach to a machine can impact vibration levels. We all know that a table saw benefits from a well-balanced blade. My Rikon band saw purrs like a kitten partly from the addition of a
Highland Woodworking Wood Slicer® blade
. In a test done with a lesser quality blade, the vibration registered almost 40% higher. The sanding belt that was preinstalled on the sander was of poor quality. The joint, or splice, in the belt had a defined ridge, or bump, that was adding greatly to the vibration of the machine. Changing to a better quality sanding belt made a big difference.
With all this said and done, you really just want to know, does it sand well? The answer is an emphatic "yes!" With 2030 SFPM (square feet per minute) of belt speed and 1720 RPM of disc speed, you can hog off material quickly. The dust collection, while not great, is really no better or worse than any other combination sander on the market. The ability to get to the idler end of the belt platen and sand concave curves is a real plus. Orienting the belt platen assembly vertically expands sanding options.
The 10" disc size on the Rikon is "just right" for most shops. Twelve-inch models start to get very pricey, as do the replacement sanding pads. Six-inch disc models provide so little usable workspace that they hardly seem practical. Remember, you can only use the half of the disc that is spinning down toward the worktable, so a 10" disc has an effective usable workspace of 5 inches. Obviously a 12" disc would have 6" of useful work surface, but a 6" disc only allows you to sand on 3" of the disc.
The design of the Rikon combination sander is sound. The machine is heavy and solid, the components are of high quality. The electrical and wiring, which I had a chance to inspect while the machine was apart, are excellent. Perhaps my machine was built on a Friday or a Monday, but disassembling and reassembling the unit provided me with valuable insight and knowledge of the machine. All-in-all, the machine represents a very good value for the money relative to the competition.
This exercise provided me, and I hope you, with some valuable insight. When opinions of a piece of equipment vary widely in online reviews, all that may be necessary for those who dislike a machine is to get out a few tools and make some adjustments. And for those who got a machine built on Wednesday, you may have gotten a "perfect" machine, but you missed out on the knowledge obtained by disassembling and reassembling the unit.
(Page 1 of 3)
1
2
3
Next Page
Return to
Wood News
front page