 by Steven D. Johnson
Racine, Wisconsin
This month:
•
LED Lighting – Ready For Prime (Shop) Time?
•
Expectations
•
A Little "S"ticked Off
•
Installation of a Central Dust Collection System (Pt. 3 of a Series)
LED Lighting – Ready For Prime (Shop) Time?
Click on any picture to see a larger version.
Fluorescent tubes provide workable levels of light in my shop, but they are far from perfect. Even with solid state starters, they take time to come to full brightness and for the output color of the light to stabilize. They induce eyestrain, and whatever you do, don't break one… what a mess!
Compact Fluorescent Light (CFL) bulbs are generally a disappointment. They fully incorporate all the disadvantages of fluorescent tubes and add a few quirks of their own. The lifespan of a CFL is remarkably and consistently shorter than advertised, the bulbs get very hot at the base where the electronics are located, they break easily, contain toxic chemicals, and disposal is not easy or convenient.
The conventional (and beloved) incandescent light bulb has been tried, convicted, and given a death sentence by the government. Soon we will only be able to buy a "real" light bulb for certain special situations. Perhaps someday I will have to open the oven door and read by the light of the only decent bulb left in my house.
But I'm not ready to stick my head in the oven yet. Out of sheer frustration, I started experimenting with LED bulbs about a year ago. LEDs, of course, are quite expensive, but some special circumstances afforded me the opportunity to do some testing.
In my kitchen there is a flaky circuit that is inexplicably prone to voltage fluctuations. On that circuit, a set of three decorative pendant lights was consuming bulbs at an alarming rate… on average one of the three incandescent bulbs had to be replaced every other week. CFLs were not an option because the fixtures require a candelabra base (E12) bulb and because the fixture is on a dimmer. It took a fair bit of searching, but eventually I found three LED bulbs the right size and equivalent in light output. These LED bulbs give a cleaner, "prettier" light than even the standard incandescent bulbs they replaced, they are dimmable, and in almost a year I haven't replaced one yet (knock on wood!).
My next foray into the LED world was for outside floodlights. Halogen bulbs had been performing well, last a respectable length of time, and provide plenty of light, but my fixtures all require a ladder to change the bulb. Murphy's Law virtually guaranteed that a bulb would burn out only when the temperature was below zero and when dragging a ladder through the snow was pretty close to the last thing I wanted to do.
All my outdoor floodlights come on at dusk and turn off at dawn. They "idle" around half-power, and when motion is detected, switch to full power. This feature eliminated the possibility of using a CFL, plus I had no brimming confidence that a CFL would even "start" in our polar vortex cold.
Sure enough, when the temperature was a balmy minus eleven degrees and the wind was gusting above 25 MPH, one of the halogen bulbs blinked out. I took that opportunity to replace both bulbs in the fixture with LED equivalents. Compared to a halogen bulb, the LEDs were expensive, but the performance is amazing. Even though the "lux" rating was equivalent to the halogen bulbs they replaced, the apparent light produced is much brighter, the color is stunning, and they work perfectly whether at "idle" output or full power. LEDs of course also consume less electrical power than incandescent bulbs, and even less than CFLs.
In my shop there are a few sets of spotlight fixtures. These lights were originally intended to provide additional task lighting and help provide some natural (offsetting) color to the main fluorescent lighting. But as the incandescent bulbs burned out, I dutifully replaced them with CFLs. When I needed a little additional light for a task, I quickly learned to turn on the spotlights, go have a cup of coffee, wait fifteen minutes until they came up to full brightness, and get back to work. Did I mention that CFL bulbs are disappointing?
Recently one of those CFL spotlights expired and I replaced it with a similar size and shape LED bulb. There are three lights in that particular spotlight fixture, and that one LED now stands out like a diamond in a pile of coal. In fact, the LED light is so dramatically superior it prompted a visitor to ask, "What's wrong with those other two bulbs in that light fixture?"
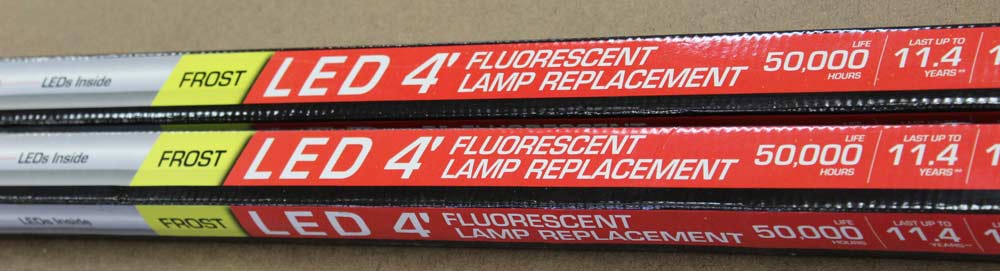
With this limited albeit extremely positive experience with LEDs I wondered if LEDs could eventually replace the 4-foot fluorescent tubes that supply the majority of light in my shop. As you probably know, LED replacement bulbs are just now starting to get shelf space in stores; candelabra bulbs, spotlights, low voltage, and other "specialty" shapes and sizes of bulbs can be very difficult to find. Replacements for the ubiquitous 48" fluorescent tubes are downright scarce. Eventually I located two bulbs made by Feit.

|
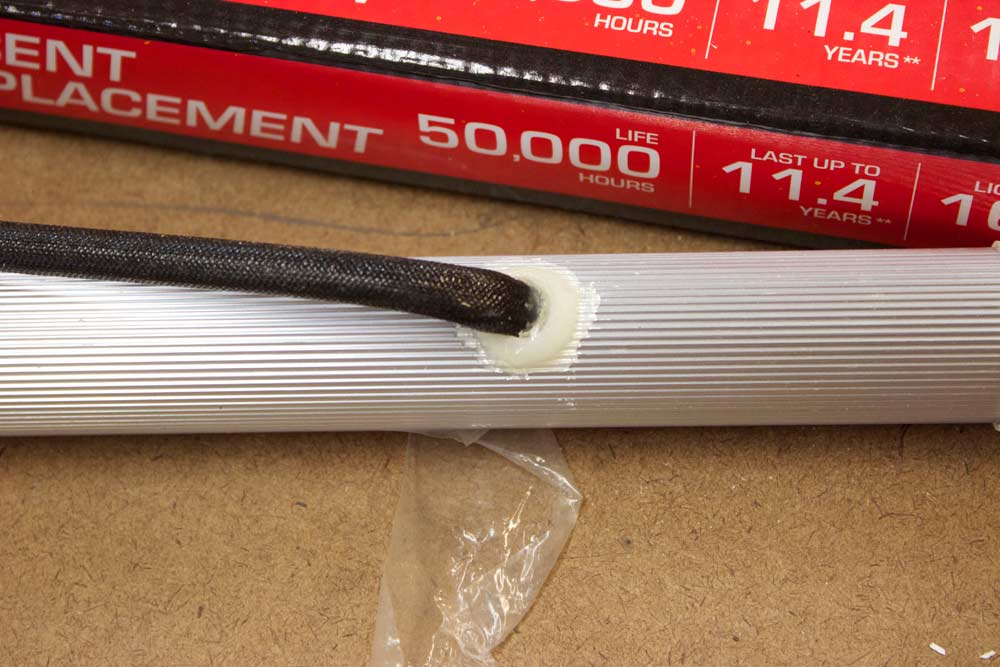
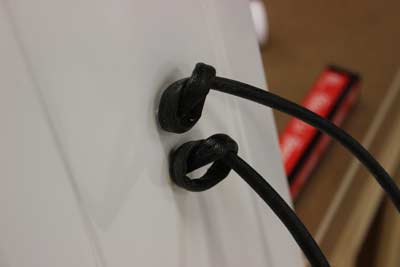
Figure 2 - Power line exiting back of LED tube - note
the "less-than-grand" engineering/technique for
securing the wire in the hole
|
The first thing to be aware of, at least currently, is that changing over to LED tubes is not so much a "replacement" as a "retrofit."
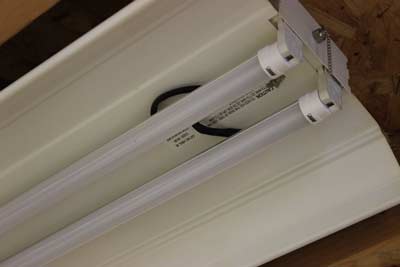
LED tubes run on regular "mains" current, i.e. your 110 volt shop circuits, therefore the ballast in the fluorescent fixture is bypassed. Unaltered current flows directly to the LED. For that reason, a cable protrudes from the back of each replacement (retrofit) tube. Unlike a conventional fluorescent tube, an LED tube has an opaque backside, an internal reflector, and "frosting" on the glass, all which serve to direct light down and to the sides, making the LED even more efficient.
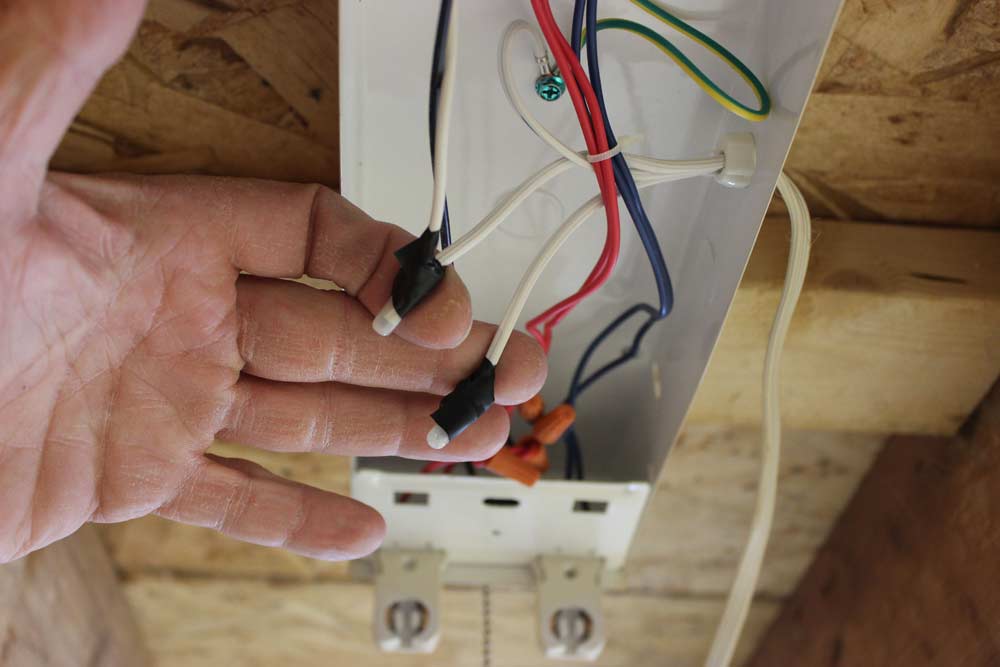
Installing the new LED tubes is simple, but four hands make it much easier than trying to do it alone. The first step is to disconnect and/or turn off the power to the existing light. Then remove the bulbs and cover. Disconnect the main power supply wires leading to the ballast. There is no need to remove or discard the ballast.

|

|
Figure 3 – Locate and disconnect the incoming
power line from the ballast
|
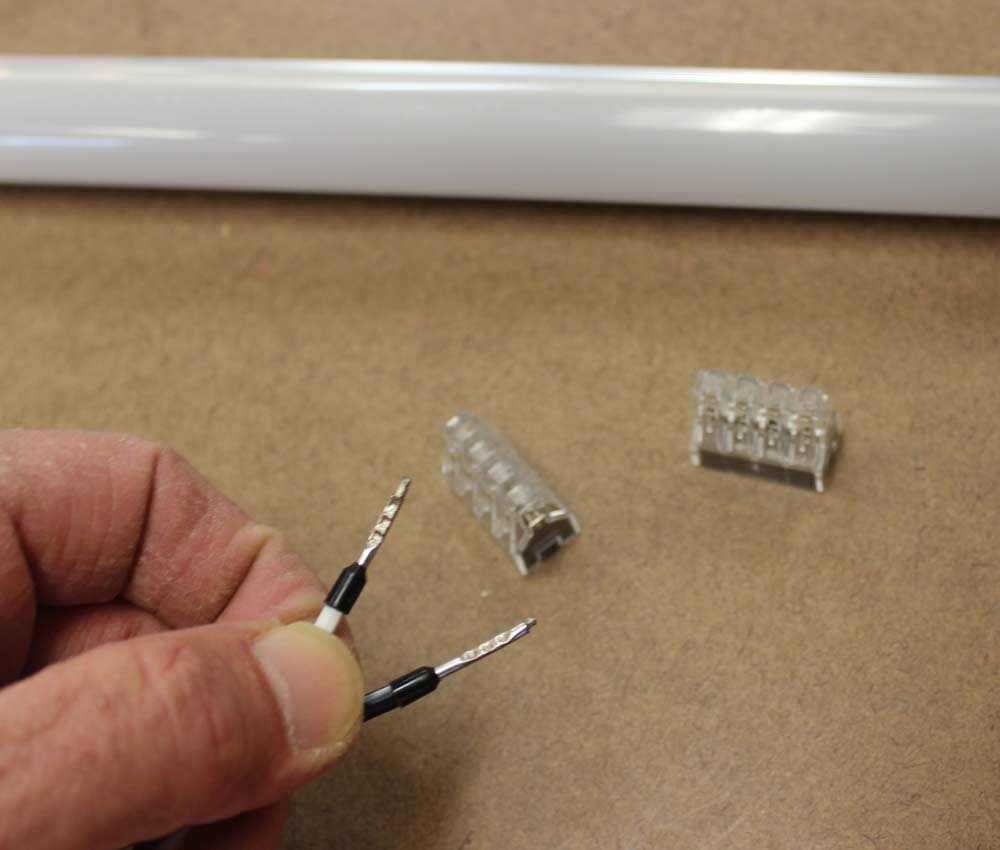
Figure 4 – LED bulb lead wires have stiff metal ends
to use with quick-connect junction blocks
|
The LED manufacturer supplies two power wire quick-connect blocks. The connector blocks require that the wires to be inserted are either solid, tinned, or have a crimp-on sheath like the ones shown in the picture above. The main power lines in my fixtures are stranded wire that is too flexible to insert into the connector blocks. So I removed the stiff ends of the LED lead wires and just used wire nuts to make the connections. Be sure to follow the manufacturer's directions.

|
|
|
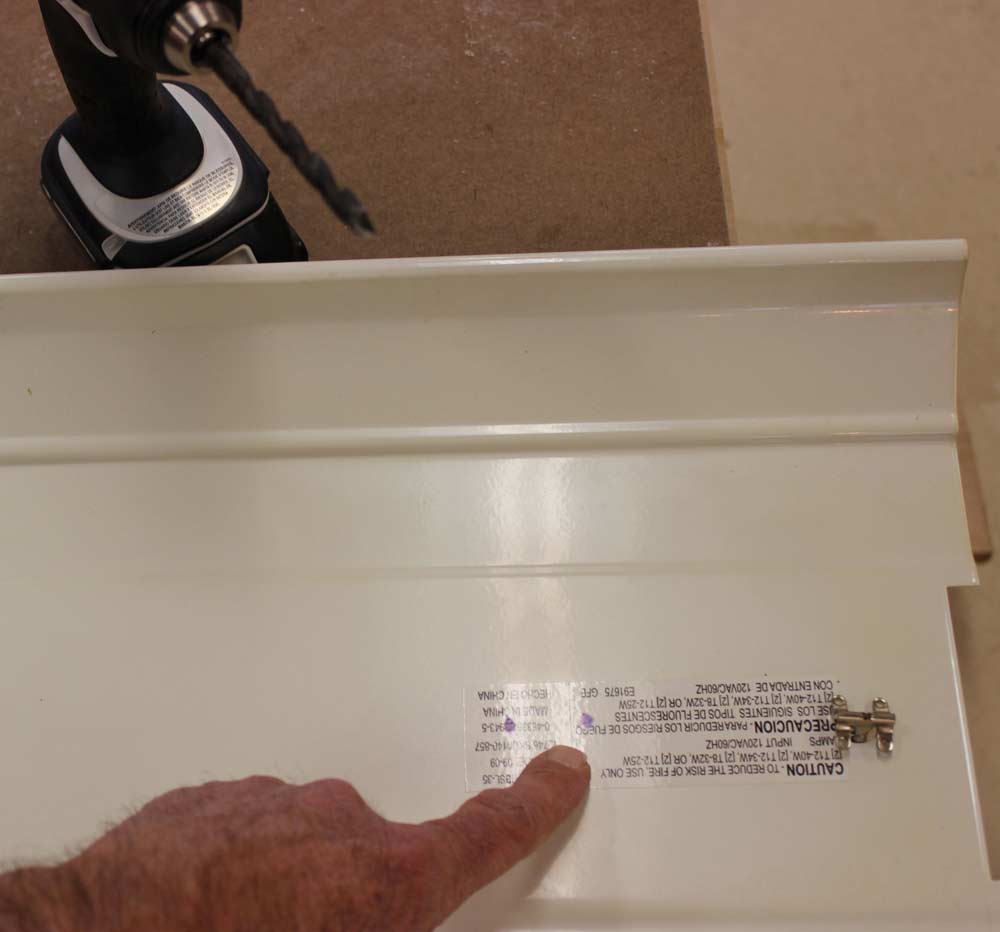
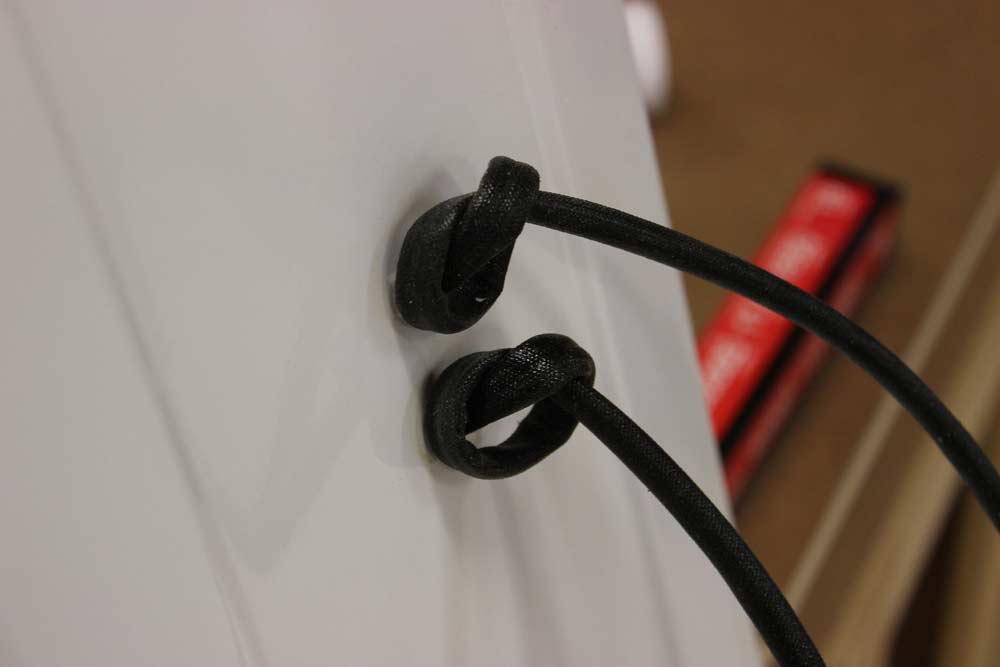
Figure 5 – Holes must be drilled for the LED power wires
|
Figure 6 - Tie knots in the LED lead wires after feeding them
through the reflector... this is very important
|
It is necessary to drill holes in the fixture cover for the LED bulb lead wires. Feed the wires through the cover and tie a knot on the back side. Here is where an extra set of hands would come in handy. While somehow holding the two replacement bulbs and the fixture cover, make the wiring connections… good luck. With the knots on the wires holding the bulbs dangling from the cover, I clipped a spring clamp to the cover and an adjacent ceiling joist to hold things in the air while I connected the wire nuts. It's a bit of a juggling act.
|
Figure 7 - The LED tubes are held in the fixture
with metal pins, just like fluorescent tubes
|
After the wires are connected, reinstall the fixture cover and insert the pins of the LED bulbs into the sockets just as you would a standard fluorescent tube. The pins on the LED bulbs, by the way, are not electrically connected and are there only to hold the bulbs in place.
When you first turn on the light, you will notice that the LED bulbs take about one-half second to light up, but when they do, they are at full power output and the color is stable.
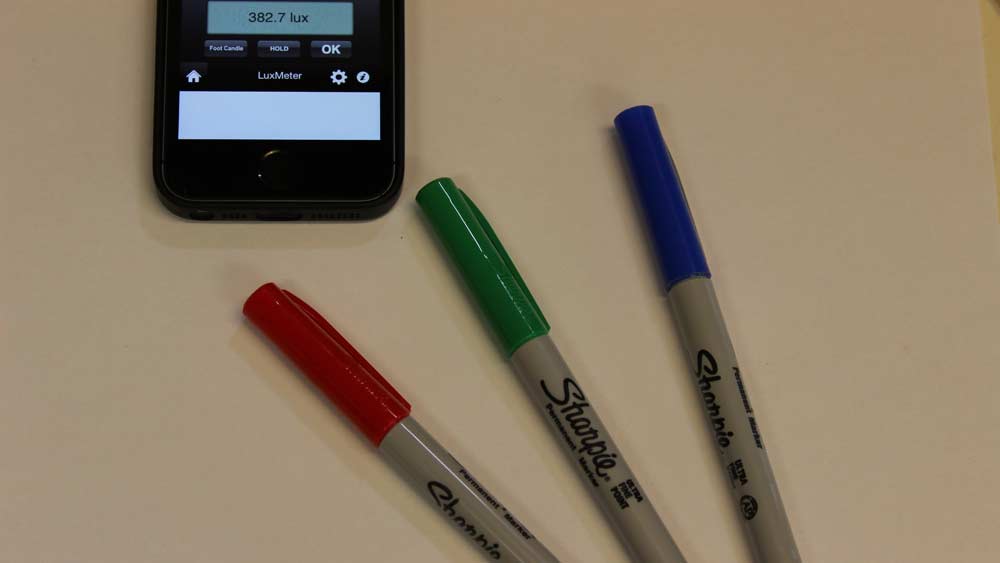
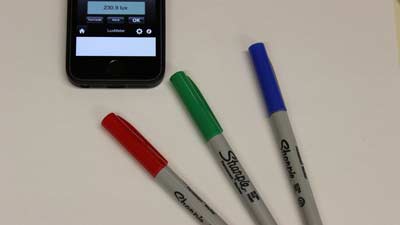
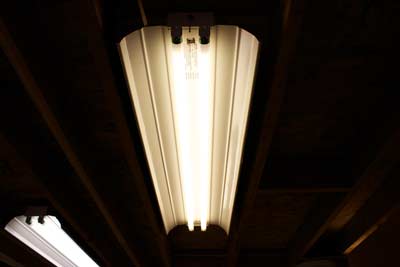
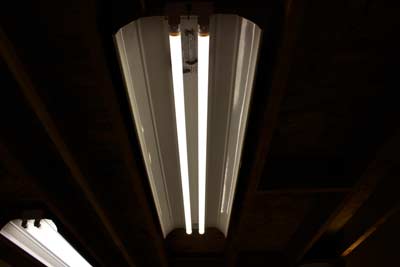
Following are three photos, all taken without flash and with identical f-stop and shutter speed. The pictures are "raw" images, un-retouched. The photos were taken directly beneath the light fixture, sixty inches from the light.
|
Figure 8 - Top photo was taken under the original fluorescent
light when first turned on. The middle photo is after 15
minutes. The bottom photo is after the LED "retrofit."
|
The first photo is with the conventional fluorescent tubes immediately after turning on the light. Note the color and the lux reading of 210.
The second photo was taken fifteen minutes later, after the fluorescent lights had warmed up and stabilized. Note that the light output is now 382 lux. Also note the change in color.
The third photo is after the fixture was converted to LED bulbs. The first and most startling difference is in color rendition. The background is truly white, and the red, green, and blue markers are true to the originals. Note also that the scene appears brighter, even though the lux reading is 230.9. Remember, the camera was not moved and the exposure settings were identical.
The lux readings may be misleading, as there is now a noticeable pool of brighter, whiter light in the middle of my shop. My neighbor dropped by the other day and he was trying to show me something small and detailed, and without looking up and without knowing I had changed out one of my lights, he moved directly underneath the new LED light to show me the fine print on the package he was holding. I was amazed that he subconsciously picked out the spot with the "best" light in my shop.
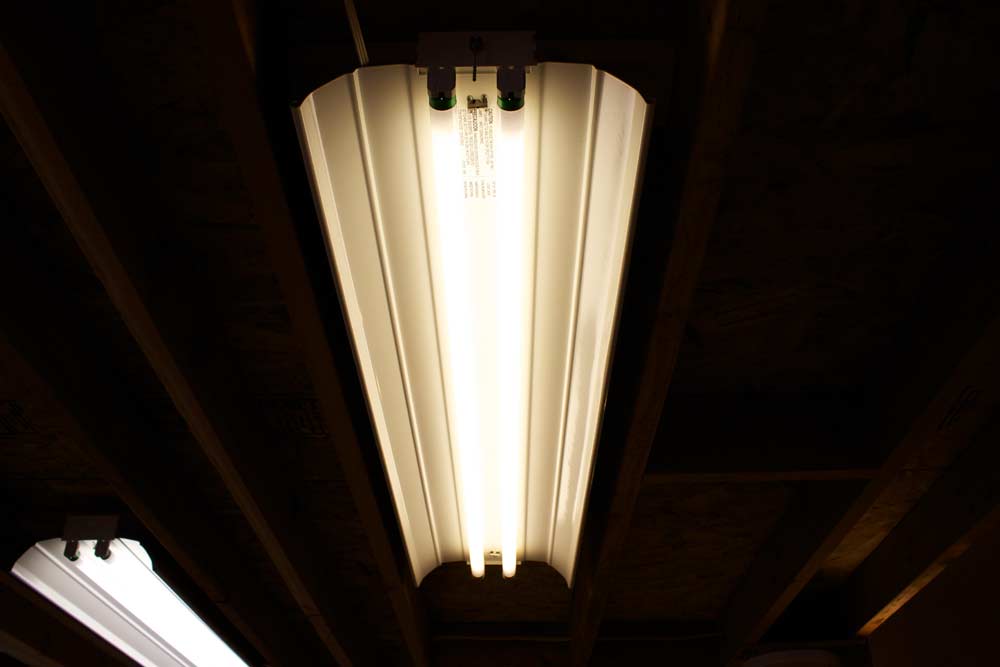
As noted before, the LED tubes cast a directional light, unlike the fluorescent tubes that cast light in a 360-degree radius and depend upon the fixture's reflector to direct the light downward. As a result, the fluorescent fixture's reflector will appear dark (see photo below). The LED tubes require no warm up time, hold a steady and pleasant light spectrum color, use less energy (supposedly about 50 – 60% of the wattage for the same light output), generate very little heat, are less fragile, cannot develop that annoying "fluorescent hum," and do not have the high frequency, supposedly invisible, flicker of a fluorescent bulb. I wish I could afford to replace every fluorescent bulb in my shop with these LED tubes.
The cost is certainly a downside. The two tubes I purchased cost about $60. I ran every calculation possible, and there is simply not a viable payback on a cost basis alone. For example, if a ballast failed on one of my fluorescent fixtures (and they all will eventually) the replacement ballast cost is $14.99. LED tubes last 2.5 times as long as fluorescent bulbs, so the lifetime equivalent replacement cost of fluorescent bulbs would be $19.95 ($7.98 per twin pack of bulbs X 2.5). That cost total of $34.94 is still just half the cost of the LED tubes. Comparing power consumption, the electrical savings will be a little less than $20 each year.
|
|
Figure 9 - Fluorescent tubes throw light in every
direction, much of it wasted
|
Figure 10 - LED tubes direct light down, less light wasted
|
The installation… bypassing the existing ballast, drilling holes in the fixture, wiring the bulbs into the circuit, etc.… is not conducive to convenient replacement when the LED bulbs eventually burn out, and smacks of a product that is still not quite "ready for prime time."
Ultimately the LED conversion decision will be driven by other factors. I have always been sensitive to fluorescent lighting. Reading under a fluorescent light quickly triggers a headache, eyestrain is noticeable, and even with the "best" electronic ballasts in my fluorescent lights, I get a noticeable hum and electromagnetic interference that impacts my radio reception. When judging the subtle color differences between pieces of wood, matching grain patterns, or inspecting a coat of finish, I always use supplemental light or take the pieces outside because the color of the fluorescent light is so "off."
I have fourteen two-tube fluorescent fixtures in my shop now, so for me the conversion will be gradual. Certainly when a ballast goes out I will immediately convert that fluorescent fixture to LED. I may convert one or two directly above my workbench sooner, especially if I find myself "flush" with cash (unexpected, but hopeful!). And who knows, like all new technology, the cost will eventually come down. But I have to tell you, I wish I could afford to make a complete conversion today… the difference is that amazing.
(Page 1 of 4)
1
2
3
4
Next Page
Return to
Wood News
front page